Configure SR-IOV
By configuring physical server nodes to support the creation of virtual machines with SR-IOV (Single Root I/O Virtualization) network cards, virtual machines can achieve lower latency and support IPv6 single-stack and IPv4/IPv6 dual-stack functionalities.
Glossary
| Term | Description |
|---|---|
| Multus CNI | Acts as middleware for other CNI plugins with Kubernetes, enabling Kubernetes to support multiple network interfaces for Pods. |
| SR-IOV | Virtualizes the physical network card of a node into multiple VFs for use by Pods or virtual machines, providing superior network performance. |
| VF | A device virtualized from a physical PCI device that can be directly allocated to a virtual machine or container, similar to an independent physical PCI device, greatly improving I/O performance. |
Constraints and Limitations
The SR-IOV feature relies on glibc and only supports version 2.34 and above. Therefore, it cannot be used on Kylin V10 and CentOS 7.x operating systems, as they do not support this version.
Prerequisites
Obtain the following Chart and images and upload them to the image repository. This document uses the build-harbor.example.cn repository address as an example. Please contact the relevant personnel for specific methods to obtain the Chart and images.
Chart
- build-harbor.example.cn/example/chart-sriov-network-operator:v3.15.0
Images
- build-harbor.example.cn/3rdparty/sriov/sriov-network-operator:4.13
- build-harbor.example.cn/3rdparty/sriov/sriov-network-operator-config-daemon:4.13
- build-harbor.example.cn/3rdparty/sriov/sriov-cni:4.13
- build-harbor.example.cn/3rdparty/sriov/ib-sriov-cni:4.13
- build-harbor.example.cn/3rdparty/sriov/sriov-network-device-plugin:4.13
- build-harbor.example.cn/3rdparty/sriov/network-resources-injector:4.13
- build-harbor.example.cn/3rdparty/sriov/sriov-network-operator-webhook:4.13
- build-harbor.example.cn/3rdparty/kubectl:v3.15.1
Procedure
Note: All commands below are executed in the terminal.
Enable SR-IOV in the BIOS of the Physical Machine
Before configuration, you can use the following command to view motherboard information.
$ dmidecode -t 1
# dmidecode 3.3
Getting SMBIOS data from sysfs.
SMBIOS 2.7 present.

Handle 0x0100, DMI type 1, 27 bytes
System Information
    Product Name: PowerEdge R620
    Version: Not Specified
    Serial Number: 7SJNF62
    UUID: 4c4c4544-0053-4a10-804e-b7c04f463632
    Wake-up Type: Power Switch
    SKU Number: SKU=NotProvided;ModelName=PowerEdge R620
    Family: Not Specified
The operation to enable SR-IOV in the BIOS of servers from different manufacturers may vary. Please refer to the manufacturer’s documentation. Generally, the operation is as follows:
-
Restart the server.
-
When the brand LOGO appears on the screen during the BIOS POST process, press the F2 key to enter the system setup program.
-
Click Processor Settings > Virtualization Technology, and change Virtualization Technology to
Enabled. -
Click Settings > Integrated devices, and change SR-IOV Global Enable to
Enabled. -
Save the configuration and restart the server.
Enable IOMMU
The operation to enable IOMMU varies with different operating systems. Please refer to the documentation of the respective operating system. This document uses CentOS as an example.
-
Edit the
/etc/default/grubfile and addintel_iommu=on iommu=ptto theGRUB_CMDLINE_LINUXentry.GRUB_CMDLINE_LINUX="crashkernel=auto rd.lvm.lv=centos/root rhgb quiet intel_iommu=on iommu=pt" -
Execute the following command to generate the
grub.cfgfile.grub2-mkconfig -o /boot/grub2/grub.cfg -
Restart the server.
-
Execute the following command. If the output shows
IOMMU enabled, it indicates that the feature is successfully enabled.dmesg | grep -i iommu
Load VFIO Module in the System Kernel
-
Execute the following command to load the vfio-pci module.
$ modprobe vfio-pci -
After loading, execute the following command. If the configuration information is displayed correctly, it indicates that the VFIO kernel module has been loaded successfully.
$ # On CentOS, execute the following command to check the VFIO loading status
$ lsmod|grep vfio
vfio_pci               41993  0
vfio_iommu_type1       22440  0
vfio                   32657  2 vfio_iommu_type1,vfio_pci
irqbypass              13503  2 kvm,vfio_pc
$
$
$ # On Ubuntu, execute the following command to check the VFIO loading status
$ cat /lib/modules/$(uname -r)/modules.builtin | grep vfio
kernel/drivers/vfio/vfio.ko
kernel/drivers/vfio/vfio_virqfd.ko
kernel/drivers/vfio/vfio_iommu_type1.ko
kernel/drivers/vfio/pci/vfio-pci-core.ko
kernel/drivers/vfio/pci/vfio-pci.ko
Create VF Devices
-
Execute the following command to view the devices currently supporting VF.
$ find /sys -name *vfs*

/sys/devices/pci0000:00/0000:00:03.0/0000:05:00.1/sriov_totalvfs
/sys/devices/pci0000:00/0000:00:03.0/0000:05:00.1/sriov_numvfs
/sys/devices/pci0000:00/0000:00:03.0/0000:05:00.0/sriov_totalvfs
/sys/devices/pci0000:00/0000:00:03.0/0000:05:00.0/sriov_numvfs
Explanation of the output:
-
0000:05:00.1: PCI address of the SR-IOV physical network card enp5s0f1.
-
0000:05:00.0: PCI address of the SR-IOV physical network card enp5s0f0.
-
sriov_totalvfs: Number of supported VFs.
-
sriov_numvfs: Current number of VFs.
-
-
Execute the following command to obtain the network card information of the physical machine.
$ ifconfig enp5s0f0: flags=4163<UP,BROADCAST,RUNNING,MULTICAST> mtu 1500 inet 192.168.66.213 netmask 255.255.255.0 broadcast 192.168.66.255 inet6 1066::192:168:66:213 prefixlen 112 scopeid 0x0<global> inet6 fe80::a236:9fff:fe29:6c00 prefixlen 64 scopeid 0x20<link> ether a0:36:9f:29:6c:00 txqueuelen 1000 (Ethernet) RX packets 13889 bytes 1075801 (1.0 MB) RX errors 0 dropped 1603 overruns 0 frame 0 TX packets 5057 bytes 440807 (440.8 KB) TX errors 0 dropped 0 overruns 0 carrier 0 collisions 0 enp5s0f1: flags=4163<UP,BROADCAST,RUNNING,MULTICAST> mtu 1500 inet6 fe80::a236:9fff:fe29:6c02 prefixlen 64 scopeid 0x20<link> ether a0:36:9f:29:6c:02 txqueuelen 1000 (Ethernet) RX packets 1714 bytes 227506 (227.5 KB) RX errors 0 dropped 1604 overruns 0 frame 0 TX packets 70 bytes 19241 (19.2 KB) TX errors 0 dropped 0 overruns 0 carrier 0 collisions 0 -
Execute the command
ethtool -i <network card name>to obtain the PCI address of the corresponding physical network card. Here is an example.$ ethtool -i enp5s0f0 driver: ixgbe version: 5.15.0-76-generic firmware-version: 0x8000030d, 14.5.8 expansion-rom-version: bus-info: 0000:05:00.0 ## PCI address of the enp5s0f0 network card supports-statistics: yes supports-test: yes supports-eeprom-access: yes supports-register-dump: yes supports-priv-flags: yes $ $ $ ethtool -i enp5s0f1 driver: ixgbe version: 5.15.0-76-generic firmware-version: 0x8000030d, 14.5.8 expansion-rom-version: bus-info: 0000:05:00.1 ## PCI address of the enp5s0f1 network card supports-statistics: yes supports-test: yes supports-eeprom-access: yes supports-register-dump: yes supports-priv-flags: yes -
Execute the following command to create VFs. This document uses the configuration of the enp5s0f1 network card as an example. If multiple network cards need to be virtualized, all network cards must be configured.
$ cat /sys/devices/pci0000:00/0000:00:03.0/0000:05:00.1/sriov_totalvfs ## View the number of supported VFs 63 $ $ echo 8 > /sys/devices/pci0000:00/0000:00:03.0/0000:05:00.1/sriov_numvfs ## Set the current number of VFs $ $ cat /sys/devices/pci0000:00/0000:00:03.0/0000:05:00.1/sriov_numvfs ## View the current number of VFs 8 -
Execute the following command to check if the VF has been successfully created.
Note: You can see the addresses of the 8 configured VFs, such as
05:10.1. These VF addresses need to be supplemented with the domain identifier, resulting in:0000:05:10.1.$ lspci |grep Virtual 00:11.0 PCI bridge: Intel Corporation C600/X79 series chipset PCI Express Virtual Root Port (rev 05) 05:10.1 Ethernet controller: Intel Corporation 82599 Ethernet Controller Virtual Function (rev 01) 05:10.3 Ethernet controller: Intel Corporation 82599 Ethernet Controller Virtual Function (rev 01) 05:10.5 Ethernet controller: Intel Corporation 82599 Ethernet Controller Virtual Function (rev 01) 05:10.7 Ethernet controller: Intel Corporation 82599 Ethernet Controller Virtual Function (rev 01) 05:11.1 Ethernet controller: Intel Corporation 82599 Ethernet Controller Virtual Function (rev 01) 05:11.3 Ethernet controller: Intel Corporation 82599 Ethernet Controller Virtual Function (rev 01) 05:11.5 Ethernet controller: Intel Corporation 82599 Ethernet Controller Virtual Function (rev 01) 05:11.7 Ethernet controller: Intel Corporation 82599 Ethernet Controller Virtual Function (rev 01)
Bind VFIO Driver
-
Download the binding script file and execute the command
$ python3 dpdk-devbind.py -b vfio-pci <VF address with domain identifier>to bind the 8 VFs of the enp5s0f1 network card to the vfio-pci driver. Here is an example.$ python3 dpdk-devbind.py -b vfio-pci 0000:05:10.1 $ python3 dpdk-devbind.py -b vfio-pci 0000:05:10.3 $ python3 dpdk-devbind.py -b vfio-pci 0000:05:10.5 $ python3 dpdk-devbind.py -b vfio-pci 0000:05:10.7 $ python3 dpdk-devbind.py -b vfio-pci 0000:05:11.1 $ python3 dpdk-devbind.py -b vfio-pci 0000:05:11.3 $ python3 dpdk-devbind.py -b vfio-pci 0000:05:11.5 $ python3 dpdk-devbind.py -b vfio-pci 0000:05:11.7 -
After successful binding, execute the following command to view the binding results. Check the drivers of the VFs already bound in the Network devices using DPDK-compatible driver section of the output. The VF device ID is
10ed.$ python3 dpdk-devbind.py --status Network devices using DPDK-compatible driver ============================================ 0000:05:10.1 '82599 Ethernet Controller Virtual Function 10ed' drv=vfio-pci unused=ixgbevf 0000:05:10.3 '82599 Ethernet Controller Virtual Function 10ed' drv=vfio-pci unused=ixgbevf 0000:05:10.5 '82599 Ethernet Controller Virtual Function 10ed' drv=vfio-pci unused=ixgbevf 0000:05:10.7 '82599 Ethernet Controller Virtual Function 10ed' drv=vfio-pci unused=ixgbevf 0000:05:11.1 '82599 Ethernet Controller Virtual Function 10ed' drv=vfio-pci unused=ixgbevf 0000:05:11.3 '82599 Ethernet Controller Virtual Function 10ed' drv=vfio-pci unused=ixgbevf 0000:05:11.5 '82599 Ethernet Controller Virtual Function 10ed' drv=vfio-pci unused=ixgbevf 0000:05:11.7 '82599 Ethernet Controller Virtual Function 10ed' drv=vfio-pci unused=ixgbevf Network devices using kernel driver =================================== 0000:01:00.0 'NetXtreme BCM5720 Gigabit Ethernet PCIe 165f' if=eno1 drv=tg3 unused=vfio-pci 0000:01:00.1 'NetXtreme BCM5720 Gigabit Ethernet PCIe 165f' if=eno2 drv=tg3 unused=vfio-pci 0000:02:00.0 'NetXtreme BCM5720 Gigabit Ethernet PCIe 165f' if=eno3 drv=tg3 unused=vfio-pci 0000:02:00.1 'NetXtreme BCM5720 Gigabit Ethernet PCIe 165f' if=eno4 drv=tg3 unused=vfio-pci 0000:05:00.0 'Ethernet 10G 2P X520 Adapter 154d' if=enp5s0f0 drv=ixgbe unused=vfio-pci *Active* 0000:05:00.1 'Ethernet 10G 2P X520 Adapter 154d' if=enp5s0f1 drv=ixgbe unused=vfio-pci No 'Baseband' devices detected ============================== No 'Crypto' devices detected ============================ No 'DMA' devices detected ========================= No 'Eventdev' devices detected ============================== No 'Mempool' devices detected ============================= No 'Compress' devices detected ============================== No 'Misc (rawdev)' devices detected =================================== No 'Regex' devices detected ===========================
Deploy Multus CNI Plugin
-
Go to Platform Management.
-
In the left navigation bar, click Clusters > Clusters.
-
Click the name of the virtual machine cluster and switch to the Plugins tab.
-
Deploy the Multus CNI plugin by following the instructions provided in the platform interface. Make sure all necessary configurations are applied as per your cluster requirements.
Deploy sriov-network-operator
Execute the following command to deploy the sriov-network-operator.
REGISTRY=<$registry>  # Replace <$registry> with the repository address where the sriov-network-operator image is located, e.g., REGISTRY=build-harbor.example.cn
NICSELECTOR=["<nics>"] # Replace <nics> with the network card names, e.g., NICSELECTOR=["ens802f1","ens802f2"], separate multiple names with commas
NUMVFS=<numVfs> # Replace <numVfs> with the number of VFs, e.g., NUMVFS=8

cat <<EOF | kubectl create -f -
apiVersion: operator.alauda.io/v1alpha1
kind: AppRelease
metadata:
  annotations:
    auto-recycle: "true"
    interval-sync: "true"
  name: sriov-network-operator
  namespace: cpaas-system
spec:
  destination:
    cluster: ""
    namespace: "kube-system"
  source:
    charts:
    - name: <chartName> # Replace <chartName> with the actual chart path, e.g., name = example/chart-sriov-network-operator
      releaseName: sriov-network-operator
      targetRevision: v3.15.0
    repoURL: $REGISTRY
  timeout: 120
  values:
    global:
      registry:
        address: $REGISTRY
    networkNodePolicy:
      nicSelector: $NICSELECTOR
      numVfs: $NUMVFS
EOF
Set Node Role Labels for Physical Nodes
Note: Ensure that the sriov-network-operator Pod is running normally before performing this operation.
-
Go to Platform Management.
-
In the left navigation bar, click Clusters > Clusters.
-
Click the cluster name and switch to the Nodes tab.
-
Click on the physical node that supports SR-IOV, then click Update Labels.
-
Set the label for the node as follows:
node-role.kubernetes.io/worker: ""
-
Click Update.
Check if Resources are Created Successfully
In the CLI tool, execute the command kubectl -n cpaas-system get sriovnetworknodestates to verify that the resources have been successfully created and are in the desired state. Check the status and ensure that all nodes are correctly configured and reporting back as expected.
$  kubectl -n cpaas-system get sriovnetworknodestates
NAME                      SYNC STATUS           AGE
192.168.254.88            Succeeded             5d22h
Set SR-IOV Node Feature Labels for Physical Nodes
Note: Ensure that the sriovnetworknodestates resource has been successfully created before performing this operation.
-
Go to Platform Management.
-
In the left navigation bar, click Clusters > Clusters.
-
Click the cluster name and switch to the Nodes tab.
-
Click on the physical node that supports SR-IOV, then click Update Labels.
-
Set the label for the node as follows:
feature.node.kubernetes.io/network-sriov.capable: "true"
Check if the Network Card Device is Supported
-
Run the command
lspci -n -s <VF address with domain identifier>to obtain the vendor ID and device ID of the current network card. An example is shown below.$ lspci -n -s 0000:05:00.1 05:00.1 0200: 8086:154d (rev 01)Explanation of the output:
- 8086: Vendor ID.
- 154d: Device ID.
-
Run the command
lspci -s <VF address with domain identifier> -vvv | grep Ethernetto get the name of the current network card. An example is shown below.$ lspci -s 0000:05:00.1 -vvv | grep Ethernet 05:00.1 Ethernet controller: Intel Corporation Ethernet 10G 2P X520 Adapter (rev 01) -
In the
cpaas-systemnamespace, find the ConfigMap namedsupported-nic-idsand check if the data section contains the configuration information for the current network card.Note: If the current network card is not in the supported list, refer to Step 4 to add the network card to the configuration file. If it is already supported, skip Step 4 .
kind: ConfigMap apiVersion: v1 metadata: name: supported-nic-ids namespace: cpaas-system data: Broadcom_bnxt_BCM57414_2x25G: 14e4 16d7 16dc Broadcom_bnxt_BCM75508_2x100G: 14e4 1750 1806 Intel_i40e_10G_X710_SFP: 8086 1572 154c Intel_i40e_25G_SFP28: 8086 158b 154c Intel_i40e_40G_XL710_QSFP: 8086 1583 154c Intel_i40e_X710_X557_AT_10G: 8086 1589 154c Intel_i40e_XXV710: 8086 158a 154c Intel_i40e_XXV710_N3000: 8086 0d58 154c Intel_ice_Columbiaville_E810: 8086 1591 1889 Intel_ice_Columbiaville_E810-CQDA2_2CQDA2: 8086 1592 1889 Intel_ice_Columbiaville_E810-XXVDA2: 8086 159b 1889 Intel_ice_Columbiaville_E810-XXVDA4: 8086 1593 1889 -
Add the current network card in the form of
: to the supported list in the data section. An example is shown below.kind: ConfigMap apiVersion: v1 metadata: name: supported-nic-ids namespace: cpaas-system data: Broadcom_bnxt_BCM57414_2x25G: 14e4 16d7 16dc Broadcom_bnxt_BCM75508_2x100G: 14e4 1750 1806 Intel_Corporation_X520: 8086 154d 10ed ## Newly added network card information Intel_i40e_10G_X710_SFP: 8086 1572 154c Intel_i40e_25G_SFP28: 8086 158b 154c Intel_i40e_40G_XL710_QSFP: 8086 1583 154c Intel_i40e_X710_X557_AT_10G: 8086 1589 154c Intel_i40e_XXV710: 8086 158a 154c Intel_i40e_XXV710_N3000: 8086 0d58 154c Intel_ice_Columbiaville_E810: 8086 1591 1889 Intel_ice_Columbiaville_E810-CQDA2_2CQDA2: 8086 1592 1889 Intel_ice_Columbiaville_E810-XXVDA2: 8086 159b 1889 Intel_ice_Columbiaville_E810-XXVDA4: 8086 1593 1889Explanation of parameters:
- Intel_Corporation_X520: Name of the network card, which can be customized.
- 8086: Vendor ID.
- 154d: Device ID.
- 10ed: VF Device ID, which can be found in the binding result .
Configure IP Address
Log in to the switch to configure DHCP (Dynamic Host Configuration Protocol).
Note: If DHCP is not supported, manually configure the IP address in the virtual machine.
Result Verification
-
Go to Container Platform.
-
In the left navigation bar, click Virtualization > Virtual Machines.
-
Click Create VM and select SR-IOV for the Network Type when adding a secondary network interface.
-
Complete the virtual machine creation.
-
Use VNC to access the virtual machine. You should see that
eth1has successfully obtained an IP address, indicating that the configuration was successful.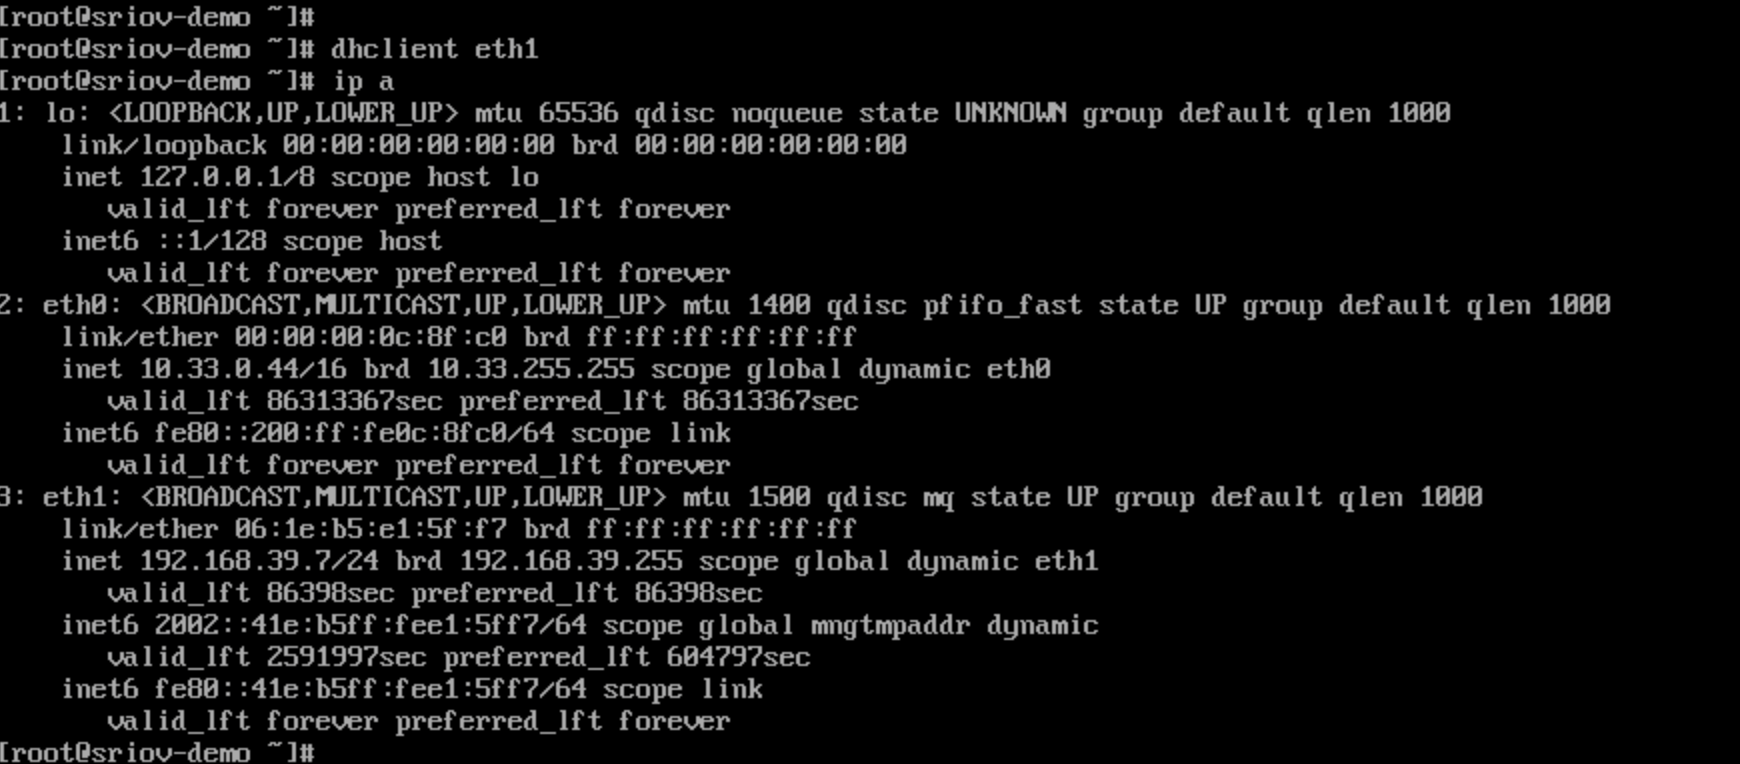
Related Instructions
Kernel Parameter Configuration for CentOS Virtual Machines
After using an SR-IOV network card in a CentOS virtual machine, you need to modify the kernel parameters for the corresponding network card. Follow these steps:
-
Open the terminal and execute the following command to modify the kernel parameters for the corresponding network card. Replace
<Network Card Name>with the actual name of the network card.sysctl -w net.ipv4.conf.<Network Card Name>.rp_filter=2 echo "net.ipv4.conf.<Network Card Name>.rp_filter=2" >> /etc/sysctl.conf -
Execute the following command to load and apply all kernel parameter commands in the
/etc/sysctl.conffile to make the kernel configuration effective. When the value in the output is 2, the modification is successful.sysctl -pOutput:
net.ipv4.conf.<Network Card Name>.rp_filter = 2