Deploy distributed storage with mixed types of devices
This solution can help you efficiently and reasonably utilize both SSD (Solid State Drives) and HDD (Hard Disk Drives) storage devices in the same cluster. For storage usage scenarios with high I/O requirements, it can achieve performance-tiered management of storage devices and improve storage read and write performance.
Usage restrictions
Only applicable to CephFS file storage and CephRBD block storage.
Solution overview
This solution is implemented using the rook-ceph Operator and TopoLVM Operator. Considering the characteristics of SSDs with small capacity but faster speed and HDDs with large capacity but slower speed, the relevant design is as follows:
-
The capacity of SSDs should be at least 10% of that of HDDs.
-
Manage SSDs through TopoLVM and use them to store metadata.
-
Manage HDDs through Kubernetes’ local-storage and use them to store data.
-
Configure CephFS file storage or CephRBD block storage through the rook-ceph Operator and declare storage through the above TopoLVM and local-storage.
Preparations
Tip: In this solution, the term cluster refers to the target cluster where the storage devices are located, and all interface operations mentioned are performed under the target cluster.
-
Check the SSDs of All Nodes in the cluster to ensure that they have not been partitioned and are therefore raw disks. If the disks are not raw, execute the following command to quickly clear them.
Caution: Make sure that there is no important data on the disks or that relevant backups have been completed.
dd if=/dev/zero of=/dev/$sda bs=4k count=512 # Replace $sda Specific disk name -
On the cluster All Nodes, install lvm2 (Logical Volume Manager) and bc (Basic Calculator) in sequence.
yum install -y lvm2 bc
Configure TopoLVM
Note: If TopoLVM has already been used in the cluster, make sure that the existing TopolvmCluster instance meets the requirements of Step 2 , and then proceed to create a storage class ( Step 3 ) for this solution.
Procedure
-
On the left navigation bar of the platform management page, click Catalog > Operators.
-
On the Deployed Operators tab, click topolvm-operator to create/update the TopolvmCluster instance.
The instance must meet the following requirements. When the successClasses.state in the YAML file is in the create successful state, the operation is successful.
Parameter Description name The name of the instance. spec.topolvmVersion The image address of TopoLVM. If there are no special requirements, use the default image. deviceClasses.nodeName The name of the node where the SSD disk to be used is located.
Note: If there are multiple nodes, they need to be set separately.deviceClasses.classes The device class, where each device class corresponds to a group of storage devices with the same characteristics.
Note: In this solution, only one device class needs to be set for each node. If multiple storage solutions coexist, you can also set multiple device classes for this solution and TopoLVM storage solutions used separately.classes.className The name of the device class. It is recommended to fill in according to the nature of the disk, for example: osd-meta.
Caution: In this solution, the device class names on each node must be consistent.classes.volumeGroup The group used to create volumes, which must be unique in the current node. classes.default Each node must have and only have one device class set to true, which is the default category.classes.devices The disks to be mounted, which must be block devices. Multiple disks can be mounted. devices.name The name of the disk, please fill in according to the actual situation, for example /dev/sda.The YAML example is as follows.
apiVersion: topolvm.cybozu.com/v1 kind: TopolvmCluster metadata: name: topolvmcluster spec: topolvmVersion: 10.0.130.54:5000/acp/topolvm:fb8bb31 deviceClasses: - nodeName: 10.0.100.200 classes: - className: osd-meta volumeGroup: mygroup default: true devices: - name: /dev/sda - nodeName: 10.0.100.300 classes: - className: osd-meta volumeGroup: mygroup default: true devices: - name: /dev/sda -
Create a TopoLVM storage class on any control node in the cluster.
cat << EOF | kubectl create -n rook-ceph -f -
kind: StorageClass
apiVersion: storage.k8s.io/v1
metadata:
  name: osd-meta # Storage class name,Suggested to keep this value
provisioner: topolvm.cybozu.com
parameters:
  "topolvm.cybozu.com/device-class": "osd-meta"  #TopoLVM Specified in the instance class Name
volumeBindingMode: WaitForFirstConsumer
allowVolumeExpansion: true
EOF
Configure Local Storage
You need to create a local-storage storage class and a local persistent volume in sequence.
Procedure
-
On any control node in the cluster, create a local-storage storage class.
cat << EOF | kubectl create -n rook-ceph -f - apiVersion: storage.k8s.io/v1 kind: StorageClass metadata: name: osd-data # Storage class name,Suggested to keep this value provisioner: kubernetes.io/no-provisioner reclaimPolicy: Delete volumeBindingMode: WaitForFirstConsumer EOF -
Create local persistent volumes on all cluster nodes with HDD Disk.
Note: Unlike TopoLVM, local-storage does not support dynamically creating persistent volumes. You need to manually use all HDDs to create local persistent volumes.
export HOSTIP=X.X.X.X #Node IP for i in "sdXX" "sdXX" "sdXX" #All on the node HDD disk Of Name do export SIZE=$(echo $( expr $(lsblk -rbno SIZE /dev/$i)/1024/1024/1024) | bc)Gi cat << EOF | kubectl create -f - apiVersion: v1 kind: PersistentVolume metadata: generateName: osd-data- labels: used-by: rook-ceph-osd spec: capacity: storage: $SIZE volumeMode: Block accessModes: - ReadWriteOnce persistentVolumeReclaimPolicy: Delete storageClassName: osd-data #Set in the previous section local-storage StorageClass Name local: path: /dev/$i nodeAffinity: required: nodeSelectorTerms: - matchExpressions: - key: kubernetes.io/hostname operator: In values: - $HOSTIP EOF done -
Check the result of persistent volume creation.
kubectl get pv -l used-by=rook-ceph-osd
Configuring Ceph Distributed Storage
Deploying Rook-Ceph Operator
Note: If you have already successfully configured distributed storage, it means that Rook-Ceph Operator has been deployed and you can skip this section.
Steps
-
On the Storage > Distributed Storage page of the platform management, click Configure Now.
-
On the Install Operator wizard page, click Deploy.
-
Please wait patiently. When the page automatically moves to the next step, it means that the Operator has been successfully deployed.
-
If the deployment fails, please refer to the interface prompt for processing. Then click Clean and redeploy the Operator.
-
Creating a Ceph Cluster
-
Create a Ceph cluster on any control node of the cluster.
#Please modify the environment variables according to the actual environment export REGISTRY=192.160.0.0:8080 #Private repository address export OSDCOUNT=2 #All in the cluster HDD Number of disks export DATASIZE=300Gi #Single block HDD Disk size export METADATASIZE=30Gi #Suggested minimum DATASIZE Of10% cat << EOF | kubectl create -f - apiVersion: ceph.rook.io/v1 kind: CephCluster metadata: name: ceph-cluster #Ceph Cluster Name namespace: rook-ceph spec: cephVersion: image: $REGISTRY/3rdparty/ceph/ceph:v14.2.11 storage: storageClassDeviceSets: - name: set1 count: $OSDCOUNT portable: false tuneDeviceClass: true tuneFastDeviceClass: false encrypted: false placement: tolerations: - effect: NoSchedule operator: Exists topologySpreadConstraints: - maxSkew: 1 topologyKey: kubernetes.io/hostname whenUnsatisfiable: ScheduleAnyway labelSelector: matchExpressions: - key: app operator: In values: - rook-ceph-osd volumeClaimTemplates: - metadata: name: data spec: resources: requests: storage: $DATASIZE storageClassName: osd-data #Set in the previous section local-storage StorageClass Name volumeMode: Block accessModes: - ReadWriteOnce - metadata: name: metadata spec: resources: requests: storage: $METADATASIZE storageClassName: osd-meta #Set in the previous section TopoLVM StorageClass Name volumeMode: Block accessModes: - ReadWriteOnce network: hostNetwork: true mon: count: 3 allowMultiplePerNode: false mgr: modules: - name: pg_autoscaler enabled: true crashCollector: disable: false dashboard: enabled: true monitoring: enabled: true dataDirHostPath: /var/lib/rook disruptionManagement: managePodBudgets: false placement: all: tolerations: - effect: NoSchedule operator: Exists removeOSDsIfOutAndSafeToRemove: false resources: mgr: requests: cpu: 500m memory: 512Mi mon: requests: cpu: 500m memory: 1024Mi osd: requests: cpu: 500m memory: 2048Mi EOF -
The creation process may take some time, please wait for about 30 minutes and check the deployment result of the Ceph cluster.
kubectl get pod -n rook-ceph -l app=rook-ceph-osdWhen the number of OSD container groups matches the number of HDDs and both are in a
Runningstate, the Ceph cluster deployment is successful.
If the waiting time is too long, please check the previous configuration to ensure its correctness before continuing to wait.
Add a device class
-
On any control node in the cluster, create a storage pool as needed.
File Storage Pool
cat << EOF | kubectl create -f -

apiVersion: ceph.rook.io/v1
kind: CephFilesystem
metadata:
  name: cephfs #CephFS Storage Pool Name
  namespace: rook-ceph
spec:
  metadataPool:
    replicated:
      size: 3
      requireSafeReplicaSize: true
  dataPools:
    - failureDomain: host
      replicated:
        size: 2
        requireSafeReplicaSize: true
  preservePoolsOnDelete: true
  metadataServer:
    activeCount: 1
    activeStandby: false
    placement:
      tolerations:
        - effect: NoSchedule
          operator: Exists
      podAffinity:
        podAntiAffinity:
          requiredDuringSchedulingIgnoredDuringExecution:
            - labelSelector:
                matchExpressions:
                  - key: app
                    operator: In
                    values:
                      - rook-ceph-mds
                topologyKey: kubernetes.io/hostname
              preferredDuringSchedulingIgnoredDuringExecution:
                - weight: 100
                  podAffinityTerm:
                    labelSelector:
                      matchExpressions:
                        - key: app
                          operator: In
                          values:
                            - rook-ceph-mds
    resources:
      requests:
        cpu: 500m
        memory: 2048Mi

EOF
Block Storage Pool
cat << EOF | kubectl create -f - apiVersion: ceph.rook.io/v1 kind: CephBlockPool metadata: name: cephrbd #CephRBD Storage Pool Name namespace: rook-ceph spec: failureDomain: host replicated: size: 2 EOF -
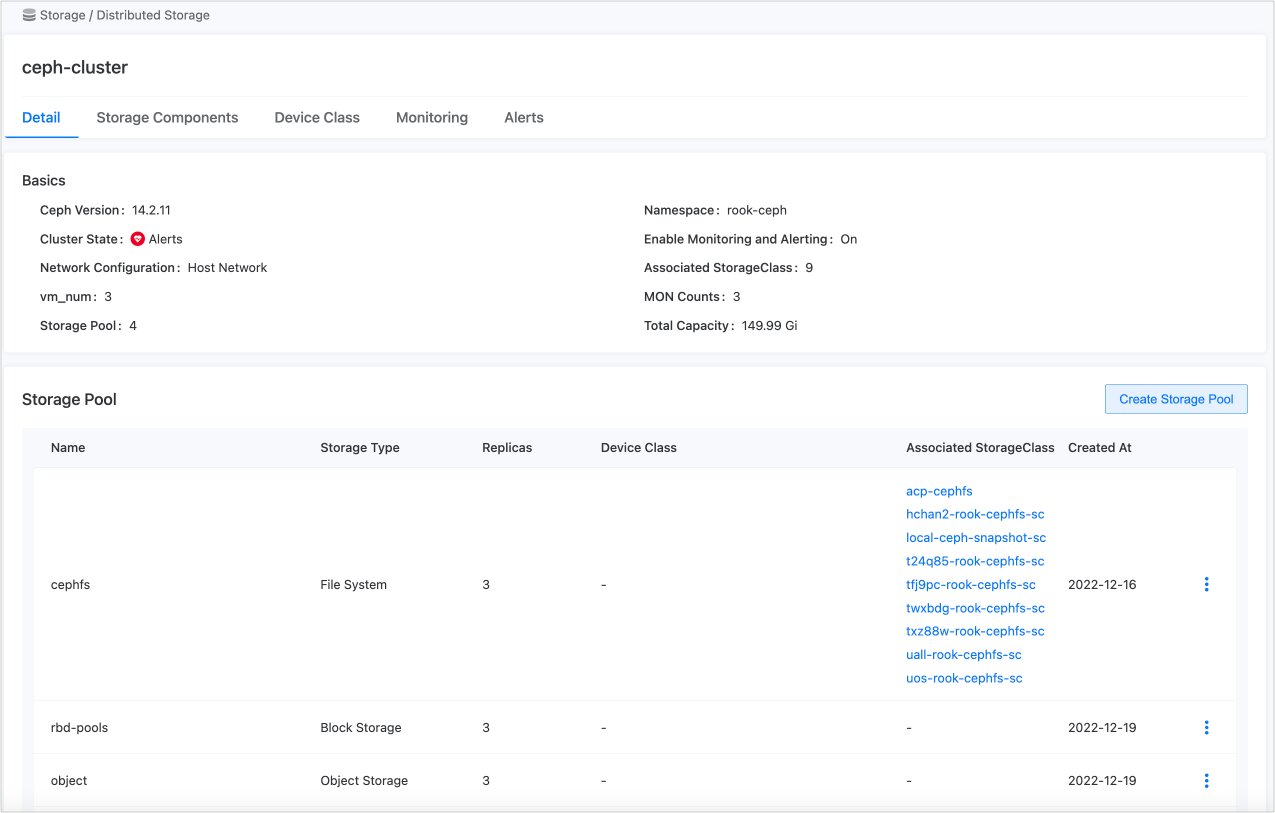
On the Storage > Distributed Storage page in the platform management console, you can see the successfully added storage pool.
Create a StorageClass
-
On the Storage > StorageClass page in the platform management console, click Create StorageClass.
-
Select CephFS File Storage or CephRBD Block Storage, and click Next.
-
Configure the parameters as required, and click Create.
Validation
Create a persistent volume claim using the Ceph-related storage class created in the previous section, and bind the persistent volume to a computing component for read and write verification.
-
On the Storage > Distributed Storage page in the platform management console, you can see the successfully added SSD and HDD disks.
-
On the Storage > PVCs page in the platform management console, create a persistent volume claim using the Ceph-related storage class created in the previous steps.
-
On the Workloads > Deployments page, bind the persistent volume claim to any deployment and mount the persistent volume.
-
Use the EXEC method to enter any container in the above deployment and perform read and write verification.
FAQ
If the TopoLVM instance fails to change to the create successful status for a long time, refer to the following steps to troubleshoot and resolve the issue.
-
Check the status of TopoLVM related container groups.
The following example shows normal status. If any container group, such as topolvm-prepare-vg-192.168.25.200-7jwfw, is in a different state, continue with the following steps.
# kubectl get pod -n operators NAME READY STATUS RESTARTS AGE topolvm-controller-6fd488cb9b-plwf8 5/5 Running 0 5h8m topolvm-controller-6fd488cb9b-t7s9p 5/5 Running 0 5h8m topolvm-node-192.168.25.200-84d7f64c54-pb8gt 4/4 Running 0 5h8m topolvm-operator-868f85bfb7-qkq8j 1/1 Running 0 5h24m topolvm-prepare-vg-192.168.25.200-7jwfw 0/1 Completed 0 5h8m -
Check the All Nodes in the cluster to ensure that lvm2 is installed .
-
Check the SSDs of All Nodes in the cluster to ensure that they are all bare disks .
-
Clean up the TopoLVM cluster.
-
Go to the Catalog > Operators page in the platform management.
-
Click on topolvm-operator in the Deployed Operators tab.
-
Export the TopoLVM instance YAML file and then delete the TopoLVM instance.
-
Based on the information in the YAML file, delete all volume groups and physical volumes on the relevant nodes in sequence.
lvm vgremove {Name of the volume group}
lvm pvremove {Physic volumes in this volume group}
-