Managing LDAP
Overview of LDAP
LDAP (Lightweight Directory Access Protocol) is a mature, flexible, and well-supported standard mechanism for interacting with directory servers. LDAP organizes data in a hierarchical tree structure to store enterprise user and organization information. It is primarily used for implementing single sign-on, allowing users to log in successfully on a company’s computer once and gain trust in other internal systems.
At the same time, LDAP allows clients to perform various operations in the LDAP server, including storing and retrieving data, searching for data matching a given set of criteria, and authenticating clients. This facilitates integration with other clients for user authentication via LDAP. For more information, please refer to the LDAP official documentation .
The platform supports integration with two LDAP types: OpenLDAP and Active Directory.
-
OpenLDAP: OpenLDAP is an open-source implementation of LDAP. If your organization uses open-source LDAP for user authentication, you can configure the platform to communicate with the LDAP service by adding LDAP to the platform and configuring relevant parameters. This allows the platform to authenticate LDAP users when they log in to the platform. For more information about OpenLDAP, please refer to the OpenLDAP official documentation .
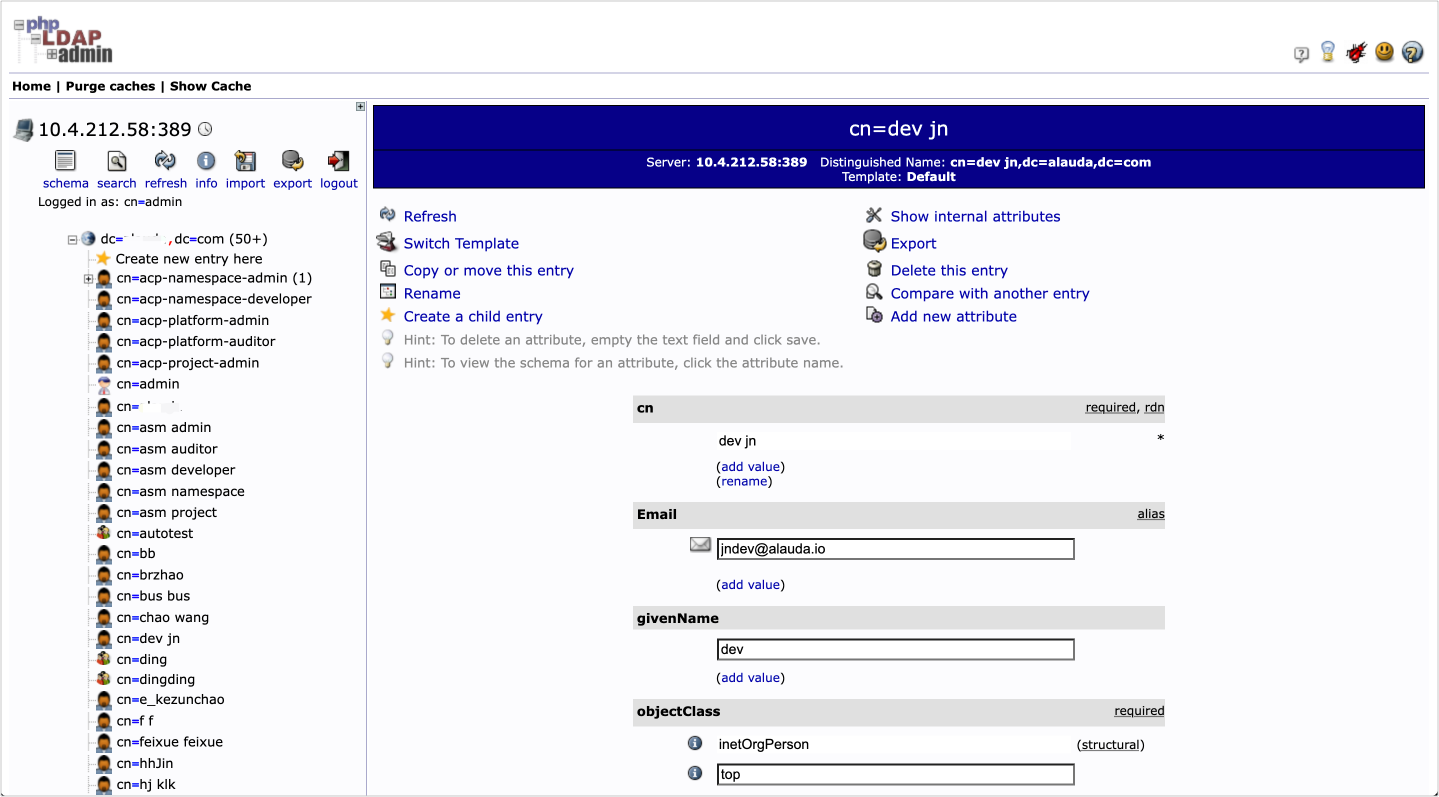
The directory tree structure in the OpenLDAP server is shown in the following diagram.
-
Active Directory: Active Directory is software developed by Microsoft based on the LDAP protocol, used to provide directory storage services for Windows systems. If your organization stores user information using Microsoft Active Directory, you can configure the platform to communicate with the Active Directory service by adding LDAP and configuring relevant parameters. This enables the platform to authenticate Active Directory users when they log in to the platform.
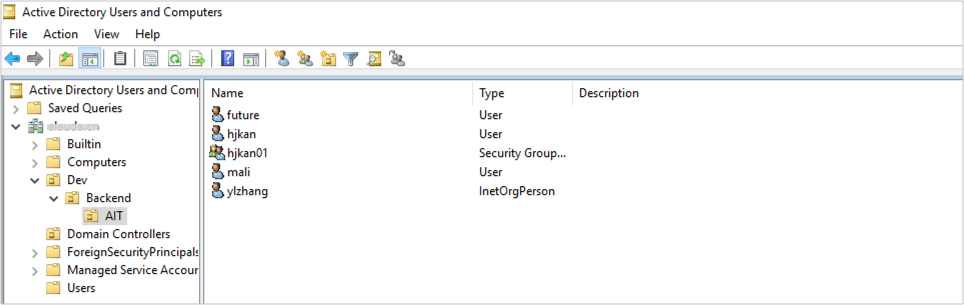
The directory tree structure in the Active Directory server is shown in the following diagram.
Refer to the table below for key LDAP terminology.
| Term | Description |
|---|---|
| Entry | LDAP’s basic model is built on entries, which are collections of attributes with a globally unique identifier (DN) used for explicit reference. Each entry’s attributes have a type and one or more values. Comparatively, an entry is like a database’s stored record, and the DN is like the keyword of a database record, while attributes are similar to database fields. For example, an entry might have attributes like cn for common name and mail for email address ( cn=Babs Jensen, mail=babs@example.com). |
| givenName | The user’s first name, e.g., givenName=xq. |
| sn | Surname, typically the user’s last name, e.g., sn=ren. |
| dn | Distinguished Name (DN), a unique identifier similar to an absolute path in a Linux file system, used for each object’s unique name, e.g., cn=admin,dc=example,dc=com. |
| rdn | Relative Distinguished Name (RDN), similar to a relative path in a Linux file system, e.g., uid=example. |
| uid | User ID, typically referring to a user’s ID, e.g., uid=example. |
| ObjectClass | An LDAP built-in data model. LDAP uses ObjectClass to specify the attributes that an entry must have (mandatory) and can have (optional). The value of ObjectClass determines the schema rules that the entry must follow. For example, the inetOrgPerson ObjectClass specifies that an entry must include the cn and sn attributes, while other optional attributes (e.g., description, seeAlso, telephoneNumber, userPassword, etc.) can be configured as needed. |
| dc | Domain Component, typically specifying a domain name that is divided into several parts. For example, dc=example,dc=com. |
| o | Organization Name, typically specifying an organization’s name, e.g., o=ogc. |
| ou | Organization Unit, typically specifying the name of an organizational unit, e.g., ou=People. |
| cn | Common Name, an attribute type typically referring to an object’s common name. For individuals, the full name is usually used, e.g., cn=Barbara Jensen. |
Typically refers to the email address of a login account, e.g., mail=example@126.com. |
Add LDAP
When your organization manages users (accounts) through OpenLDAP or Active Directory, you can integrate your enterprise’s LDAP service with the platform by adding LDAP on the platform. This allows the platform to communicate with the LDAP server, enabling enterprise users to log in to the platform and verifying their identity when logging in.
Tips:
-
After successful addition, users synchronized from LDAP to the platform can use their enterprise accounts to log in to the platform.
-
If the same LDAP is added multiple times, the LDAP synchronization will overwrite previously synchronized users.
Prerequisites
Before adding LDAP, prepare the access information for your LDAP server, including the server address, username, password, and so on.
Procedure of operation
-
In the left navigation bar, click Users > IDPs.
-
Click Add LDAP.
-
Configure the Basic Information and LDAP Server Settings parameters following the instructions below.
Parameter Name Description Server Address The access address of the LDAP server, e.g., 192.168.156.141:31758.Username The DN (Distinguished Name), a unique identifier, of the LDAP administrator account. This username corresponds to a user with binding, searching, and retrieving LDAP entry permissions, e.g., cn=admin,dc=example,dc=com.Password The login password of the LDAP administrator’s account. Login Box Username Prompt The prompt message displayed in the Username input box on the platform login page, e.g., Please enter your username. -
Choose the LDAP Type and configure the Search Settings parameters following the instructions below.
Instructions:
-
When integrating with LDAP, the platform will match LDAP user entries (Entries) based on the conditions and entry attributes specified in Search Settings to determine which users are granted access to the platform. Key attributes of users and groups will be extracted from LDAP, matched one-to-one with common attributes of platform users, making it convenient for Platform Management personnel to view, search for users, or grant user access.
-
Group search settings are used to match group attributes for users already matched by search settings. For example, if the matched users based on search settings include User1, User2, and User3, and the matched groups are G1 and G2, where User1 and User2 belong to G1, and User3 belongs to G3, then when User1, User2, and User3 are synchronized to the platform, User1 and User2 belong to the G1 user group, and User3 is not assigned to a group.
Parameter Name Description Object Type Also known as ObjectClass, enter the ObjectClass used when creating your users. For users:
- OpenLDAP default isinetOrgPerson.
- Active Directory default isorganizationalPerson. For groups, the default isposixGroup.Login Field The attribute in the entry that will be used as the Username when users log in to the platform.
- For OpenLDAP, the default ismail, requiring users to log in using their email address (e.g.,test@example.com).
- For Active Directory, the default isuserPrincipalName, requiring users to log in using their user principal name (e.g.,example@azureyun.com).Filter Conditions Used for further filtering users or groups with LDAP filter conditions .
For example:
(&(cn=John*)(givenName=*xq*)) will match entries that include cn and givenName attributes, with cn starting with John and givenName containing the xq character.
(|(givenName=John)(givenName=Jon)(givenName=Johnathan)(givenName=Jonathan)) will match all entries that contain one or more givenName values from this filter condition.Search Starting Point The starting point for searching users or user groups.
LDAP data is structured as a tree structure, and setting a search starting point restricts the search to data below that starting point.
If matched user groups include users who have already been matched, information about their associated user groups is synchronized to the platform.
For example,dc=example,dc=org.Search Scope The scope for searching users or user groups after the search starting point. Optional values are sub(search the entire directory subtree) andone(search only one level below the starting point), with the default beingsub.Login Attribute The attribute in the entry used to uniquely identify users.
- For OpenLDAP, the default isuid.
- For Active Directory, the default isdistinguishedName.Name Attribute The attribute in the entry used to specify the object’s name. The default is cn.Email Attribute The attribute in the entry used to specify the object’s email. For OpenLDAP, the default is mail. For Active Directory, the default isuserPrincipalName.Group Member Attribute The attribute in the entry used to uniquely identify group members. The default is uid.Group Attribute The attribute in the entry used to specify the relationship between user groups and group members. The default is memberuid. -
-
In the IDP Service Configuration Validation section, enter a Username and Password for an LDAP account that can be matched by the search settings above to verify that the configuration is correct.
Tips:
-
The entered account must exist in LDAP and have a username and password that can be matched by the Search Settings.
-
The Username must be the value of the attribute set as the
Login Fieldin the Search Settings. For example, if the Login Field is set tomail, you need to enter the user’s email address (e.g.,mail1@example.com).
-
-
(Optional) Click Advanced Settings and follow the instructions below to configure the LDAP Auto-Sync Policy.
Tips: After configuring an automatic synchronization policy for LDAP, the platform will automatically trigger synchronization operations at fixed times based on the synchronization rules. This will synchronize LDAP users matched by the search settings to the platform. Once user synchronization is successful, you can view the synchronized users in the user list. If you haven’t configured an automatic synchronization policy, you will need to manually synchronize users by performing the manual synchronization operation.
-
(Required for the initial configuration) Slide the Auto-Sync Users slider switch to enable automatic synchronization.
-
Refer to How to Set Up a Scheduled Trigger Rule? to select an existing rule template or create a new synchronization rule.
Tips: After setting up the automatic synchronization policy, user synchronization will not occur immediately but will be automatically triggered at fixed times based on the rule’s time interval. You can use an online tool to input a CRON expression and check the next 7 automatic synchronization times.
-
-
Click Add.
Tips: After successfully adding LDAP, users matched by the search settings can use their LDAP accounts to log in to the platform before LDAP users are synchronized to the platform. Once a user successfully logs in to the platform, their information will be automatically synchronized to the platform.
Synchronize LDAP Users
After successfully synchronizing LDAP users to the platform, you can view the synchronized users in the user list.
You can configure an automatic synchronization policy when adding LDAP (which can be updated later) or manually trigger synchronization after adding LDAP successfully. Here’s how to manually trigger a synchronization operation.
Notes:
-
Newly added users in the LDAP integrated with the platform can log in to the platform before performing the user synchronization operation. Once they successfully log in to the platform, their information will be automatically synchronized to the platform.
-
Users deleted from LDAP will have an
Invalidstatus after synchronization. -
The default validity period for newly synchronized users is Permanent.
-
Synchronized users with the same name as existing users (local users, IDP users) are automatically associated. Their permissions and validity period will be consistent with existing users. They can log in to the platform using the login method corresponding to their respective sources.
Procedure of Operation
-
In the left navigation bar, click Users > IDPs.
-
Click the LDAP name that you want to manually synchronize.
-
Click Actions > Sync user in the upper-right corner.
-
Click Sync.
Notes: If you manually close the synchronization prompt dialog, a confirmation dialog will appear to confirm the closure. After closing the synchronization prompt dialog, the system will continue to synchronize users. If you remain on the user list page, you will receive synchronization result feedback. If you leave the user list page, you will not receive synchronization results.
Relevant Operations
You can click the  on the right in the list page or click Actions in the upper-right corner on the details page to update or delete LDAP as needed.
| Operation | Description |
|---|---|
| Update LDAP | Update the configuration information of the added LDAP or the LDAP Auto-Sync Policy. Note: After updating LDAP, users currently synchronized to the platform through this LDAP will also be updated. Users removed from LDAP will become invalid in the platform user list. You can clean up junk data by executing the operation to clean up invalid users. |
| Delete LDAP | After deleting LDAP, all users synchronized to the platform through this LDAP will have an Invalid status (the binding relationship between users and roles remains unchanged), and they cannot log in to the platform. After re-integrating, synchronization needs to be re-executed to activate users. Tips: After deleting IDP, if you need to delete users and user groups synchronized to the platform through LDAP, check the checkbox Clean IDP Users and User Groups below the prompt box. |