Connecting to OpenShift Clusters
Supports connecting OpenShift clusters that have already been deployed for unified management on the platform.
Prerequisites
-
The Kubernetes version and components on the cluster meet the version requirements for connecting to public cloud clusters .
-
During the process of connecting to an OpenShift cluster, the Kubectl command will be used. Please install the Kubectl tool on the jump server that accesses the cluster in advance.
-
Ensure that the cluster is interconnected with the global cluster network. You can refer to the following steps to configure the network:
-
If the connected cluster can access the platform access address normally: No network configuration is required.
-
If the connected cluster cannot access the platform access address normally: You must add a domain name to the platform and resolve the domain name to the platform access address. Configure domain name resolution according to the actual scenario (intranet and internet). On the Update Platform Parameters page, add the domain name to Other Platform Access Addresses.
Note: After the connected cluster is successfully connected, modify the corresponding cluster resource on the global cluster master node and add the annotation:
cpaas.io/platform-url:<platform domain name address, for example: https://www.domain.cn>.
-
-
If you need to monitor real-time metrics related to the cluster, nodes, functional components, computing components (Deployment, StatefulSet,DaemonSet), Pods, containers, etc., ensure that Prometheus has been deployed on the cluster to be connected.
-
If you need to pull platform component images required by the cluster from an external mirror repository, please set up a mirror repository that stores platform component images in advance. For specific implementation plans, please contact technical support personnel.
Step 1 - Configure DNS for the Cluster
Configure DNS for the cluster by modifying the coredns configuration dictionary on the global cluster.
-
Log in to the jump server that can access the OCP cluster and execute the following command to obtain the base domain of the OCP cluster.
oc get dns cluster -o jsonpath='{.spec.baseDomain}'The example of standard output obtained is as follows:
ocp.example.com -
Log in to the platform management page of the container platform. In the left navigation bar, switch to the global cluster through the cluster switching entrance in the top navigation bar.
-
Click Cluster Management > Resource Management in the left navigation bar.
-
Find and update the
ConfigMapresource namedcpaas-corednsunder thekube-systemnamespace, as shown in the following figure.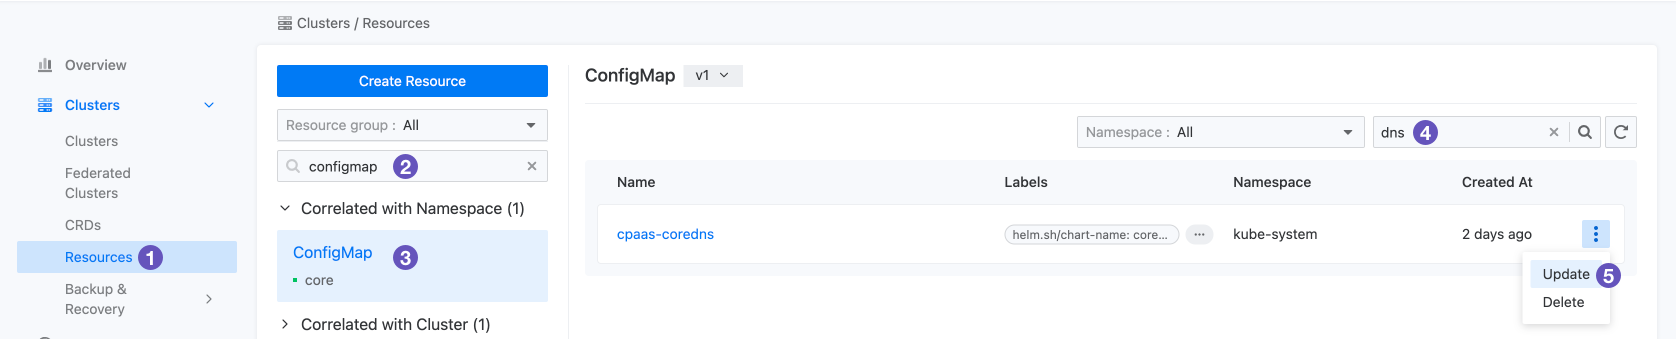
-
Search for the line containing
.:1053 {in the pop-up window. -
Copy this line, replace the dot with the base domain of the OpenShift cluster obtained in step 1.
-
Finally, add the configuration of the log and forward plugins, and add
}to make the configuration file valid. The modified configuration is shown below:
Corefile: |
# This part needs to be manually added
ocp.example.com:1053 {
    log
    forward . 192.168.31.220
}
# The following is coredns The content originally in the configuration file,No need to modify
.:1053 {
Parameter Description:
-
ocp.example.com: The base domain of the OpenShift cluster, which is the result of the command executed in the first step.
-
192.168.31.220: The DNS of the OpenShift cluster. This value can be obtained from the
/etc/resolv.conffile of the control node or compute node of the cluster.
All modified content is shown in the following figure:
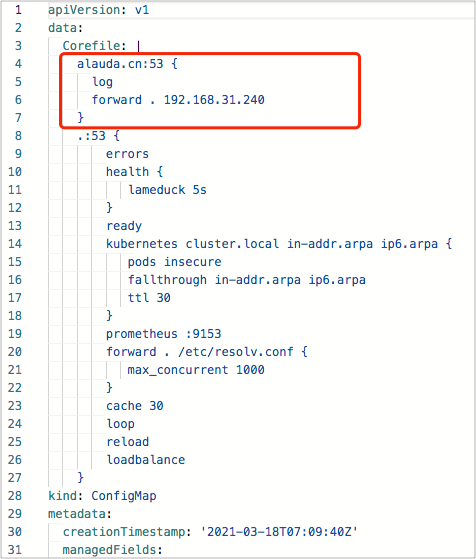
-
Step 2 - Get Cluster Information
Note: Choose one of the following two methods.
Method 1 (Recommended): Get the KubeConfig File of the Cluster
The KubeConfig file of the cluster contains the configuration information required to access the cluster, such as the cluster address, CA certificate, and authentication information.
-
Log in to the jump server that can access the OCP cluster.
-
Execute the following command to search for the location of the kubeconfig file on the entire disk (if the file location is already known, this step can be skipped).
find / -type f -name 'kubeconfig'

# If the above command does not output,Then try the following command
find / -type f -iregex '.*kube.*config.*'


# Find the file path that should be in the output of the above command kubeconfig file path,Store it in the environment variable
path_to_ocp_kubeconfig=/root/ocp4/auth/kubeconfig  # Please adjust the command here according to the actual path


# Check the searched kubeconfig Whether the file can provide sufficient permissions token
grep -qF 'current-context: admin' "$path_to_ocp_kubeconfig" \
    && echo 'The checked kubeconfig The file is legal,Can continue with the following operations!' \
    || echo 'The checked kubeconfig The file is illegal,Please stop the operation and troubleshoot!'
-
-
Exit the shell of the jump server. Return to local operations and copy the kubeconfig file from the jump server to the local machine. The command to be executed on the local terminal is as follows:
# Please adjust the path here according to the file path found in the previous step kubeconfig Adjust the path here according to the actual file location
scp root@<OCP Cluster jump server IP>:</root/ocp4/auth/kubeconfig> <Location of locally stored files>
Method 2: Obtain Cluster Token, Access Address, and CA Certificate
-
Log in to the jump server that can access the cluster.
-
Execute the following command line to generate and obtain a token with administrator privileges.
echo "
apiVersion: v1
kind: ServiceAccount
metadata:
  namespace: default
  name: cls-access
---
apiVersion: rbac.authorization.k8s.io/v1
kind: ClusterRoleBinding
metadata:
  name: cls-access
roleRef:
  apiGroup: rbac.authorization.k8s.io
  kind: ClusterRole
  name: cluster-admin
subjects:
  - kind: ServiceAccount
    namespace: default
    name: cls-access
" | kubectl apply -f -  && \
 kubectl describe secret \
 -n default $(kubectl describe sa cls-access -n default \
 |grep  Tokens: |awk '{print $2}') |grep token:
As shown in the following figure:
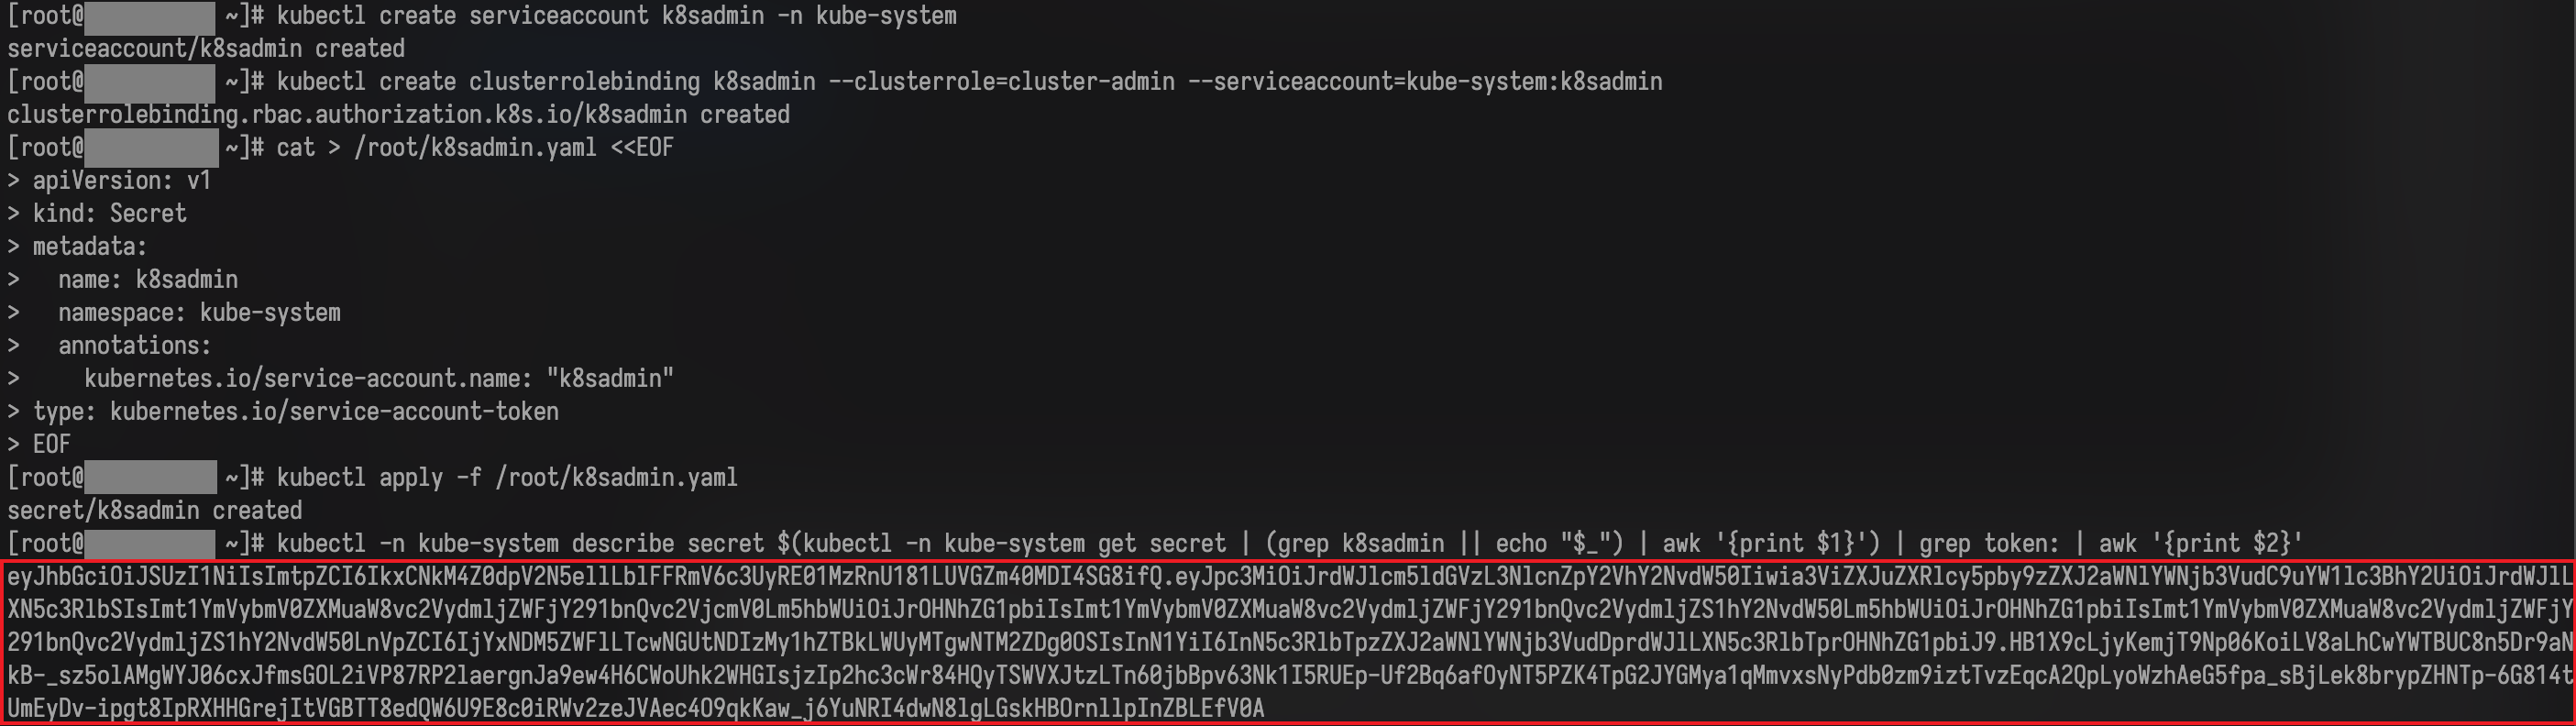
-
Execute the following command to obtain the access address of the cluster.
# Get the cluster access address(server) ssh core@<Any control node in the cluster ip> sudo grep -F server /etc/kubernetes/kubeconfig | sed 's/ *server: *//' -
Run the following command to obtain the CA certificate of the cluster.
# Get through Base64 Decoded CA certificate(certificate-authority-data)
ssh core@<Any control node in the cluster ip> sudo grep -F certificate-authority-data /etc/kubernetes/kubeconfig | sed 's/ *certificate-authority-data: *//' | base64 -d
-
Step 3 - Modify the image repository configuration of the cluster
To ensure that the cluster can pull the component images provided by the platform, please refer to this section to modify the private image repository configuration of the cluster to be connected to the platform, and change the repository address for pulling images to the repository address for storing platform component images.
Notes
Note: All host nodes that need to use images need to be modified. Depending on the way the image repository is provided, the address of the image repository is slightly different:
-
Using the built-in image repository of the platform: At this time, the address of the image repository needs to be the platform access address. You can execute the following command on the control node of the global cluster to obtain the platform access address:
kubectl get productbase base -ojsonpath='{.spec.platformURL}' | sed -E 's|https?://||'The example of standard output obtained is as follows:
container-platform.example.com # or ip address 192.168.1.13 # image repository address 192.168.1.13:8899Note: If the access to the platform access address is not available when accessing the cluster, please use an external mirror repository.
-
Using an external mirror repository: Fill in the actual mirror repository address, for example:
registry.example.cn:60080.
Steps
-
Log in to all nodes in the OCP cluster.
-
Execute the following command line on each node in turn to modify the node’s image repository configuration.
# Switch root permissions sudo -i # Configure the node,Make it support root directory read and write operations sudo chattr -i / # Create drop-in configuration file。if more address,Just repeat `--insecure-registry=` parameters,and separate them with spaces # The configuration example is as follows,Please first change the address after the parameter in the example to the actual image repository address `--insecure-registry=` parameters address according to the instructions in: sudo mkdir -p /etc/systemd/system/crio.service.d/ cat | sudo tee /etc/systemd/system/crio.service.d/99-registry-cpaas-system.conf << 'EOF' [Service] ExecStart= ExecStart=/usr/bin/crio \ --insecure-registry='<the note and the precautions address>' \ $CRIO_CONFIG_OPTIONS \ $CRIO_RUNTIME_OPTIONS \ $CRIO_STORAGE_OPTIONS \ $CRIO_NETWORK_OPTIONS \ $CRIO_METRICS_OPTIONS EOF -
Execute the following command line to restart crio.
sudo systemctl daemon-reload && sudo systemctl restart crio
Step 4 - Connect to Cluster
-
In the left navigation bar, click Cluster Management > Cluster.
-
Click Connect to Cluster.
-
Configure the relevant parameters according to the following instructions.
Parameter Description Image Repository The repository that stores the platform component images required by the cluster.If you selected “Use the built-in image repository of the platform” in “Step 3 - Modify the image repository configuration of the cluster”, select “Platform Default” here.Otherwise, select “External”.- Platform Default: The image repository configured when deploying the Platform Deployment image.- External: An external image repository that has been set up in advance. You need to enter the private image repository address, port, username, and password to access the image repository. Cluster Information Note: You can manually fill in or upload a KubeConfig file for the platform to automatically parse and fill in.Parse KubeConfig File: After uploading the obtained KubeConfig file, the platform will automatically parse and fill in the Cluster Information, and you can modify the automatically filled information.Cluster Address: The access address of the cluster’s API Server exposed to the outside world, used for the platform to access the cluster’s API Server.CA Certificate: The CA certificate of the cluster.Note: When manually entering, you need to enter the decoded certificate in Base64.Authentication Method: The authentication method used to access the cluster, which requires Token or Certificate Authentication (Client Certificate and Key) with Cluster Management Permissions. -
Click Check Connectivity to check the network connectivity with the connected cluster and automatically identify the type of the connected cluster, which will be displayed in the form of a badge in the upper right corner of the form.
-
After the connectivity check passes, click Connect and confirm.
Note:
- Click the
 icon on the right side of the cluster in the Connecting state to view the execution progress of the cluster (status.conditions) in the Execution Progress dialog box that pops up.
 - After the cluster is successfully connected, you can view the key information of the cluster in the cluster list, the status of the cluster is displayed as normal, and you can perform cluster-related operations.
- Click the
Deploying Plugins
After successfully connecting to the cluster, you can go to Plugin Management to select the necessary plugins for the cluster deployment, including monitoring components, log collection components, log storage components, etc.
Note:
- Before deploying the Log Collection Component, you have to make sure that the remaining space of the direcotry /var/cpaas is greater than 50GB. This can be done with the following command:
df -h /var/cpaas
Updating Audit Policies
After successfully connecting to the cluster, you can modify the audit policies on the cluster.
Audit policies (spec.audit.profile) support the following three types:
-
Default: The default audit policy only records the
metadataof read and write requests; OAuth access token creation is an exception and will record thebody. -
WriteRequestBodies: Records the
metadataof all requests, as well as thebodyof write requests. -
AllRequestBodies: Records the
metadataof all requests, as well as thebodyof read and write requests.
Note:
-
Resources containing sensitive information will only record
metadata. For example: Secret, Route, OAuthClient. -
For access clusters that were upgraded from an older version (4.5) to the current version, the audit data of OAuth tokens will not be recorded because the names of OAuth tokens may contain sensitive information.
Operation Steps
-
Log in to the jump server that can access the cluster.
-
Execute the command
oc edit apiserver clusterto modify the value of the spec.audit.profile field of the APIServer resource (Default, WriteRequestBodies, or AllRequestBodies) to configure the audit policy of the cluster.oc edit apiserver clusterThe YAML file example for APIServer resources is as follows:
apiVersion: config.openshift.io/v1
kind: APIServer
metadata:
  annotations:
    oauth-apiserver.openshift.io/secure-token-storage: "true"
    release.openshift.io/create-only: "true"
  creationTimestamp: "2021-09-22T09:35:02Z"
  generation: 1
  name: cluster
  resourceVersion: "944"
  selfLink: /apis/config.openshift.io/v1/apiservers/cluster
  uid: ea77d173-cbb6-4410-920f-b830a0b8537b
spec:
  audit:
    profile: Default
Enable Pod Debug Function
After successfully connecting to the cluster, if you need to use the Pod Debug function, please refer to How to Enable Pod Debug Function in Connected Cluster? .
Namespace Management in Managed Cluster
After successfully connecting to the cluster, you can add the newly connected cluster to an existing project by creating a project based on the cluster or by adding a project associated with the cluster .
Then, by importing namespaces , you can manage the Kubernetes namespaces under the cluster in the project of the platform.
Common Questions
The “Add Node” button is grayed out after connecting to the cluster. How to add nodes?
Adding nodes through the platform interface is not supported. Please contact the cluster provider to add nodes.
What certificates are supported by the certificate management function after connecting to the cluster?
-
Kubernetes certificate: All connected clusters only support viewing the APIServer certificate information in the platform certificate management interface, and do not support viewing other Kubernetes certificates or automatic rotation.
-
Platform component certificate: All connected clusters can view the platform component certificate information in the platform certificate management interface and support automatic rotation.
What other functions are not supported by the connected OpenShift cluster?
-
Audit data cannot be obtained.
-
Monitoring information related to ETCD, Scheduler, and Controller Manager is not supported, and only partial monitoring charts of APIServer are supported.
-
Information related to cluster certificates other than the Kubernetes APIServer certificate cannot be obtained.