Configure kube-ovn network to support pods with multiple NICs (Alpha)
Add multiple network interfaces to Pods using Multus CNI. Use Kube-OVN network’s Subnet and IP CRD for advanced IP management, including subnet management, IP reservation, random allocation, and fixed allocation.
Install multus cni
-
Clone the code:
git clone https://github.com/k8snetworkplumbingwg/multus-cni.git -
Enter the directory:
cd multus-cni/deployments -
Using multus resources:
kubectl apply -f multus-daemonset.yml
Creating a Subnet
-
Create a subnet named
attachnetusing the example provided innetwork-attachment-definition.yml.Caution: The provider format in the configuration should be
<NAME>.<NAMESPACE>.ovn, where<NAME>and<NAMESPACE>refer to thenameandnamespaceof the NetworkAttachmentDefinition CR, respectively.apiVersion: "k8s.cni.cncf.io/v1" kind: NetworkAttachmentDefinition metadata: name: attachnet namespace: default spec: config: '{ "cniVersion": "0.3.0", "type": "kube-ovn", "server_socket": "/run/openvswitch/kube-ovn-daemon.sock", "provider": "attachnet.default.ovn" }'Apply resources after creation.
kubectl apply -f network-attachment-definition.yml -
Use the following example to create a Kube-ovn subnet for the second network card:
subnet.yml.Caution:
-
spec.providermust be consistent with theproviderin NetworkAttachmentDefinition. -
If an Underlay subnet is needed, set the
spec.vlanof the subnet to the name of the VLAN CR that needs to be used. Other subnet parameters can be configured as needed.
apiVersion: kubeovn.io/v1
kind: Subnet
metadata:
  name: subnet1
spec:
  cidrBlock: 172.170.0.0/16
  provider: attachnet.default.ovn
Apply resources after creation.
kubectl apply -f subnet.yml -
Create pod configure multiple nics
-
Create a pod based on the following example.
Caution:
-
The
metadata.annotationsfield must include a key-value pair ofk8s.v1.cni.cncf.io/networks=default/attachnet, where the value is in the format of<NAMESPACE>/<NAME>, where<NAMESPACE>and<NAME>are the namespace and name of the NetworkAttachmentDefinition CR. -
If the pod requires three network interfaces, configure the value of
k8s.v1.cni.cncf.io/networksasdefault/attachnet,default/attachnet2.
apiVersion: v1 kind: Pod metadata: name: pod1 annotations: k8s.v1.cni.cncf.io/networks: default/attachnet spec: containers: - name: web image: nginx:latest ports: - containerPort: 80 -
-
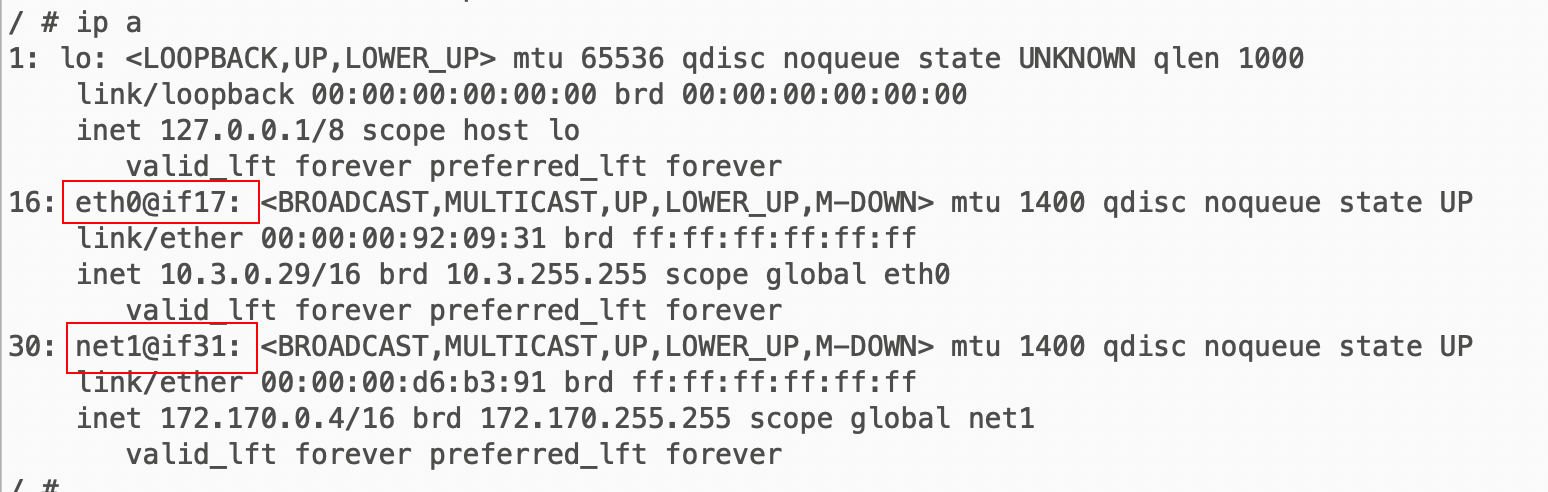
After the Pod is successfully created, use the command
kubectl exec pod1 -- ip ato view the IP address of the Pod.
-
Verify the creation of dual network cards
Other features
-
Fixed IP: If you need to fix the IP of the primary network card (first network card), the method is the same as using a fixed IP for a single network card, that is, add the Annotation
ovn.kubernetes.io/ip_address=<IP>to the Pod. If you need to fix the IP of the secondary network card (second network card or other network card), the basic method is the same as the primary network card, except that the ovn in the Annotation Key is replaced with theproviderof the corresponding NetworkAttachmentDefinition. For example:attachnet.default.ovn.kubernetes.io/ip_address=172.170.0.101. -
Additional routing: Starting from version 1.8.0, Kube-OVN supports configuring additional routing for secondary network cards. To use it, add the
routersfield to the config in the NetworkAttachmentDefinition and fill in the required routes. An example is shown below:apiVersion: "k8s.cni.cncf.io/v1" kind: NetworkAttachmentDefinition metadata: name: attachnet namespace: default spec: config: '{ "cniVersion": "0.3.0", "type": "kube-ovn", "server_socket": "/run/openvswitch/kube-ovn-daemon.sock", "provider": "attachnet.default.ovn", "routes": [ { "dst": "19.10.0.0/16" }, { "dst": "19.20.0.0/16", "gw": "19.10.0.1" } ] }'