Distributed storage network isolation
To improve storage performance, the network of the storage cluster can be configured through Ceph to provide a designated network for OSD communication. Compared to using a single network, this greatly improves the performance of the storage cluster.
Cluster network architecture diagram
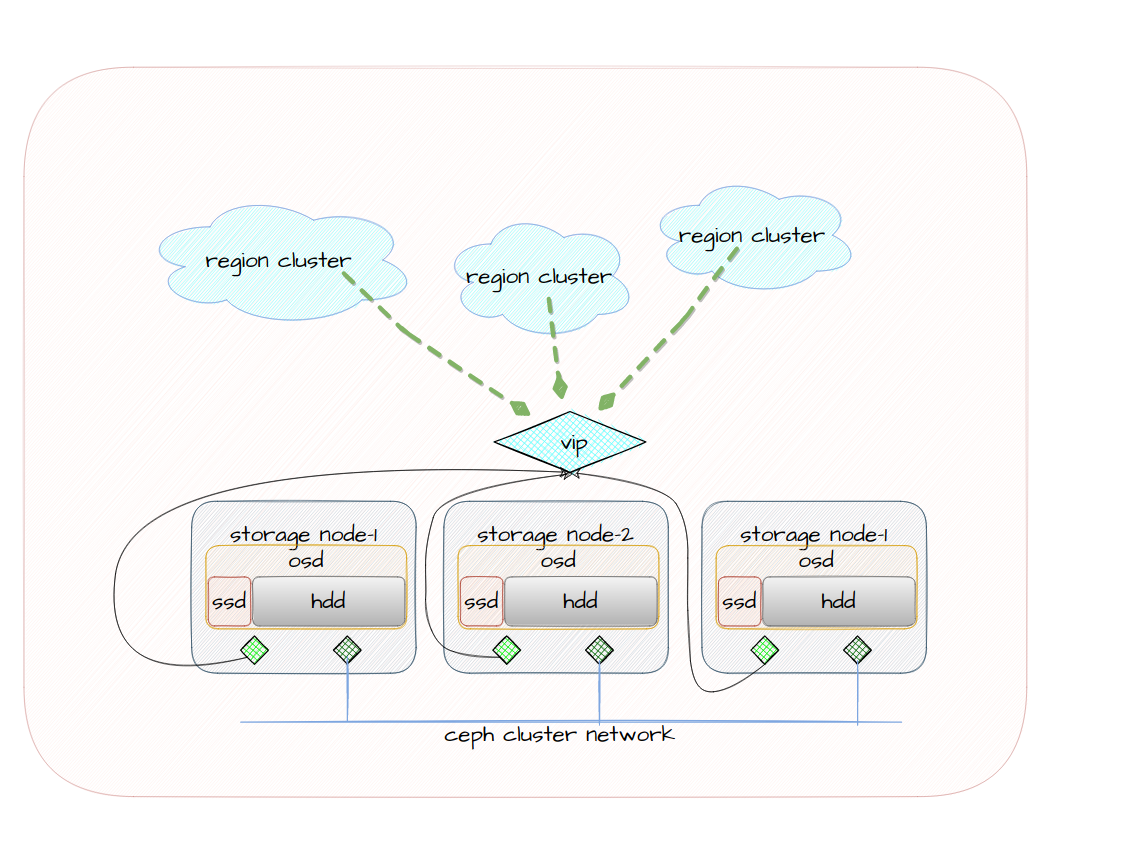
Procedure
-
To configure network isolation, you need to view the network environment of the cluster. The network environment information of this example cluster is shown in the following table:
public ip private ip 192.168.131.27/20192.168.144.127/22192.168.131.28/20192.168.144.128/22192.168.131.26/20192.168.144.126/22 -
When deploying the distributed storage on the page, before Create Cluster after Deploy Operator, you need to execute the following command on the master node of the cluster:
kubectl -n rook-ceph edit configmap rook-config-override -
Add the following information in the
configfield.Tip: The network segment parameters need to be modified according to the specific environment. The
public networkandcluster networkparameters should be the first address of the same network segment in the network environment.public network = 192.168.128.0/20 cluster network = 192.168.144.0/22 public addr = "" cluster addr = ""The modified results are as follows:
apiVersion: v1 data: config: |- [global] public network = 192.168.128.0/20 cluster network = 192.168.144.0/22 public addr = "" cluster addr = "" mon_memory_target=1073741824 mds_cache_memory_limit=2147483648 osd_memory_target=2147483648 kind: ConfigMap metadata: annotations: cpaas.io/creator: admin@cpaas.io cpaas.io/updated-at: "2021-09-23T13:19:45Z" creationTimestamp: "2021-09-23T13:17:50Z" name: rook-config-override namespace: rook-ceph resourceVersion: "259588" selfLink: /api/v1/namespaces/rook-ceph/configmaps/rook-config-override uid: 3d26f0f5-30f3-4ed2-8ec5-73d1d11bcd3c -
To create a distributed storage page, continue with Create Ceph Cluster.
-
Verify if the network is configured successfully.
-
Check the status of the Ceph machines.
HEALTH_OKindicates a healthy cluster. Execute the following command:ceph -c ceph.config -sSample Output:
cluster: id: 77a638ee-dab8-440f-8ca6-7d1c80d9f52b health: HEALTH_OK services: mon: 3 daemons, quorum a,b,c (age 31m) mgr: a(active, since 28m) osd: 3 osds: 3 up (since 30m), 3 in (since 30m) data: pools: 0 pools, 0 pgs objects: 0 objects, 0 B usage: 3.0 GiB used, 57 GiB / 60 GiB avail pgs: -
Use the command to view the OSD configuration. The bottom of the example output will indicate the usage of IP for each OSD. In this example,
192.168.131.27and192.168.144.127are the IPs in the two configured network segments. Execute the following command:ceph -c ceph.config osd dumpSample Output:
epoch 9 fsid 77a638ee-dab8-440f-8ca6-7d1c80d9f52b created 2021-09-23 13:20:27.023887 modified 2021-09-23 13:21:56.629467 flags sortbitwise,recovery_deletes,purged_snapdirs,pglog_hardlimit crush_version 5 full_ratio 0.95 backfillfull_ratio 0.9 nearfull_ratio 0.85 require_min_compat_client jewel min_compat_client jewel require_osd_release nautilus max_osd 3 osd.0 up in weight 1 up_from 7 up_thru 0 down_at 0 last_clean_interval [0,0) [v2:192.168.131.27:6800/23085,v1:192.168.131.27:6801/23085] [v2:192.168.144.127:6800/23085,v1:192.168.144.127:6801/23085] exists,up 08e1474e-8623-4368-b833-0b77635a99c6 osd.1 up in weight 1 up_from 9 up_thru 0 down_at 0 last_clean_interval [0,0) [v2:192.168.131.28:6800/20574,v1:192.168.131.28:6801/20574] [v2:192.168.144.128:6800/20574,v1:192.168.144.128:6801/20574] exists,up 315de735-7b79-4cf1-b660-67b4e1a39862 osd.2 up in weight 1 up_from 9 up_thru 0 down_at 0 last_clean_interval [0,0) [v2:192.168.131.26:6802/16942,v1:192.168.131.26:6803/16942] [v2:192.168.144.126:6800/16942,v1:192.168.144.126:6801/16942] exists,up ed6267fb-d3b3-4f86-8d53-3543ea115297 -
Check the configuration file to ensure that the modified configuration takes effect, and execute the following command:
cat /var/lib/rook/rook-ceph/rook-ceph.configSample Output:
[global] fsid = 77a638ee-dab8-440f-8ca6-7d1c80d9f52b mon initial members = c a b mon host = [v2:192.168.131.28:3300,v1:192.168.131.28:6789],[v2:192.168.131.27:3300,v1:192.168.131.27:6789],[v2:192.168.131.26:3300,v1:192.168.131.26:6789] public addr = cluster addr = public network = 192.168.128.0/20 cluster network = 192.168.144.0/22 mon_memory_target = 1073741824 mds_cache_memory_limit = 2147483648 osd_memory_target = 2147483648 -
Check the port listening status. You can see the port being listened on by the current Ceph internal service on the IP address
192.168.144.126in the example. Execute the following command:netstat -vatn | grep LISTEN | grep 680Sample Output:
tcp        0      0 192.168.131.26:6800     0.0.0.0:*               LISTEN
tcp        0      0 192.168.144.126:6800    0.0.0.0:*               LISTEN
tcp        0      0 192.168.131.26:6801     0.0.0.0:*               LISTEN
tcp        0      0 192.168.144.126:6801    0.0.0.0:*               LISTEN
tcp        0      0 192.168.144.126:6802    0.0.0.0:*               LISTEN
tcp        0      0 192.168.131.26:6802     0.0.0.0:*               LISTEN
tcp        0      0 192.168.144.126:6803    0.0.0.0:*               LISTEN
tcp        0      0 192.168.131.26:6803     0.0.0.0:*               LISTEN
tcp        0      0 192.168.131.26:6804     0.0.0.0:*               LISTEN
tcp        0      0 192.168.131.26:6805     0.0.0.0:*               LISTEN
-