Deploy ALB
TOC
ALB
ALB is a custom resource that represents a load balancer. The alb-operator, which is embedded by default in all clusters, watches for create/update/delete operations on ALB resources and creates corresponding deployments and services in response.
For each ALB, a corresponding Deployment watches all Frontends and Rules attached to that ALB and routes requests to backends based on those configurations.
Prerequisites
The high availability of the Load Balancer requires a VIP. Please refer to Configure VIP.
Configure ALB
There are three parts to an ALB configuration.
Resource Configuration
resource related field describes the deployment configuration for the alb.
| Field | Type | Description |
|---|---|---|
.spec.config.nodeSelector | map[string]string | the node selector for the alb |
.spec.config.replicas | int,optional default 3 | the number of replicas for the alb |
.spec.config.resources.limits | k8s container-resource,optional | limit of nginx container of alb |
.spec.config.resources.requests | k8s container-resource,optional | request of nginx container of alb |
.spec.config.resources.alb.limits | k8s container-resource,optional | limit of alb container of alb |
.spec.config.resources.alb.requests | k8s container-resource,optional | request of alb container of alb |
.spec.config.antiAffinityKey | string,optional default local | k8s antiAffinityKey |
Networking Configuration
Networking fields describe how to access the ALB. For example, in host mode, alb will use hostnetwork, and you can access the ALB via the node IP.
| Field | Type | Description |
|---|---|---|
.spec.config.networkMode | string: host or container, optional, default host | In container mode, the operator creates a LoadBalancer Service and uses its address as the ALB address. |
.spec.address | string,required | you could manually specify the address of alb |
.spec.config.vip.enableLbSvc | bool, optional | Automatically true in container mode. |
.spec.config.vip.lbSvcAnnotations | map[string]string, optional | Extra annotations for the LoadBalancer Service. |
project configuration
| Field | Type |
|---|---|
.spec.config.projects | []string,required |
.spec.config.portProjects | string,optional |
.spec.config.enablePortProject | bool,optional |
Adding an ALB to a project means:
- In the web UI, only users in the given project can find and configure this ALB.
- This ALB will handle ingress resources belonging to this project. Please refer to ingress-sync.
- In the web UI, rules created in project X cannot be found or configured under project Y.
If you enable port project and assign a port range to a project, this means:
- You cannot create ports that do not belong to the port range assigned to the project.
tweak configuration
there are some global config which can be tweaked in alb cr.
Operation On ALB
Creating
Using the web console.
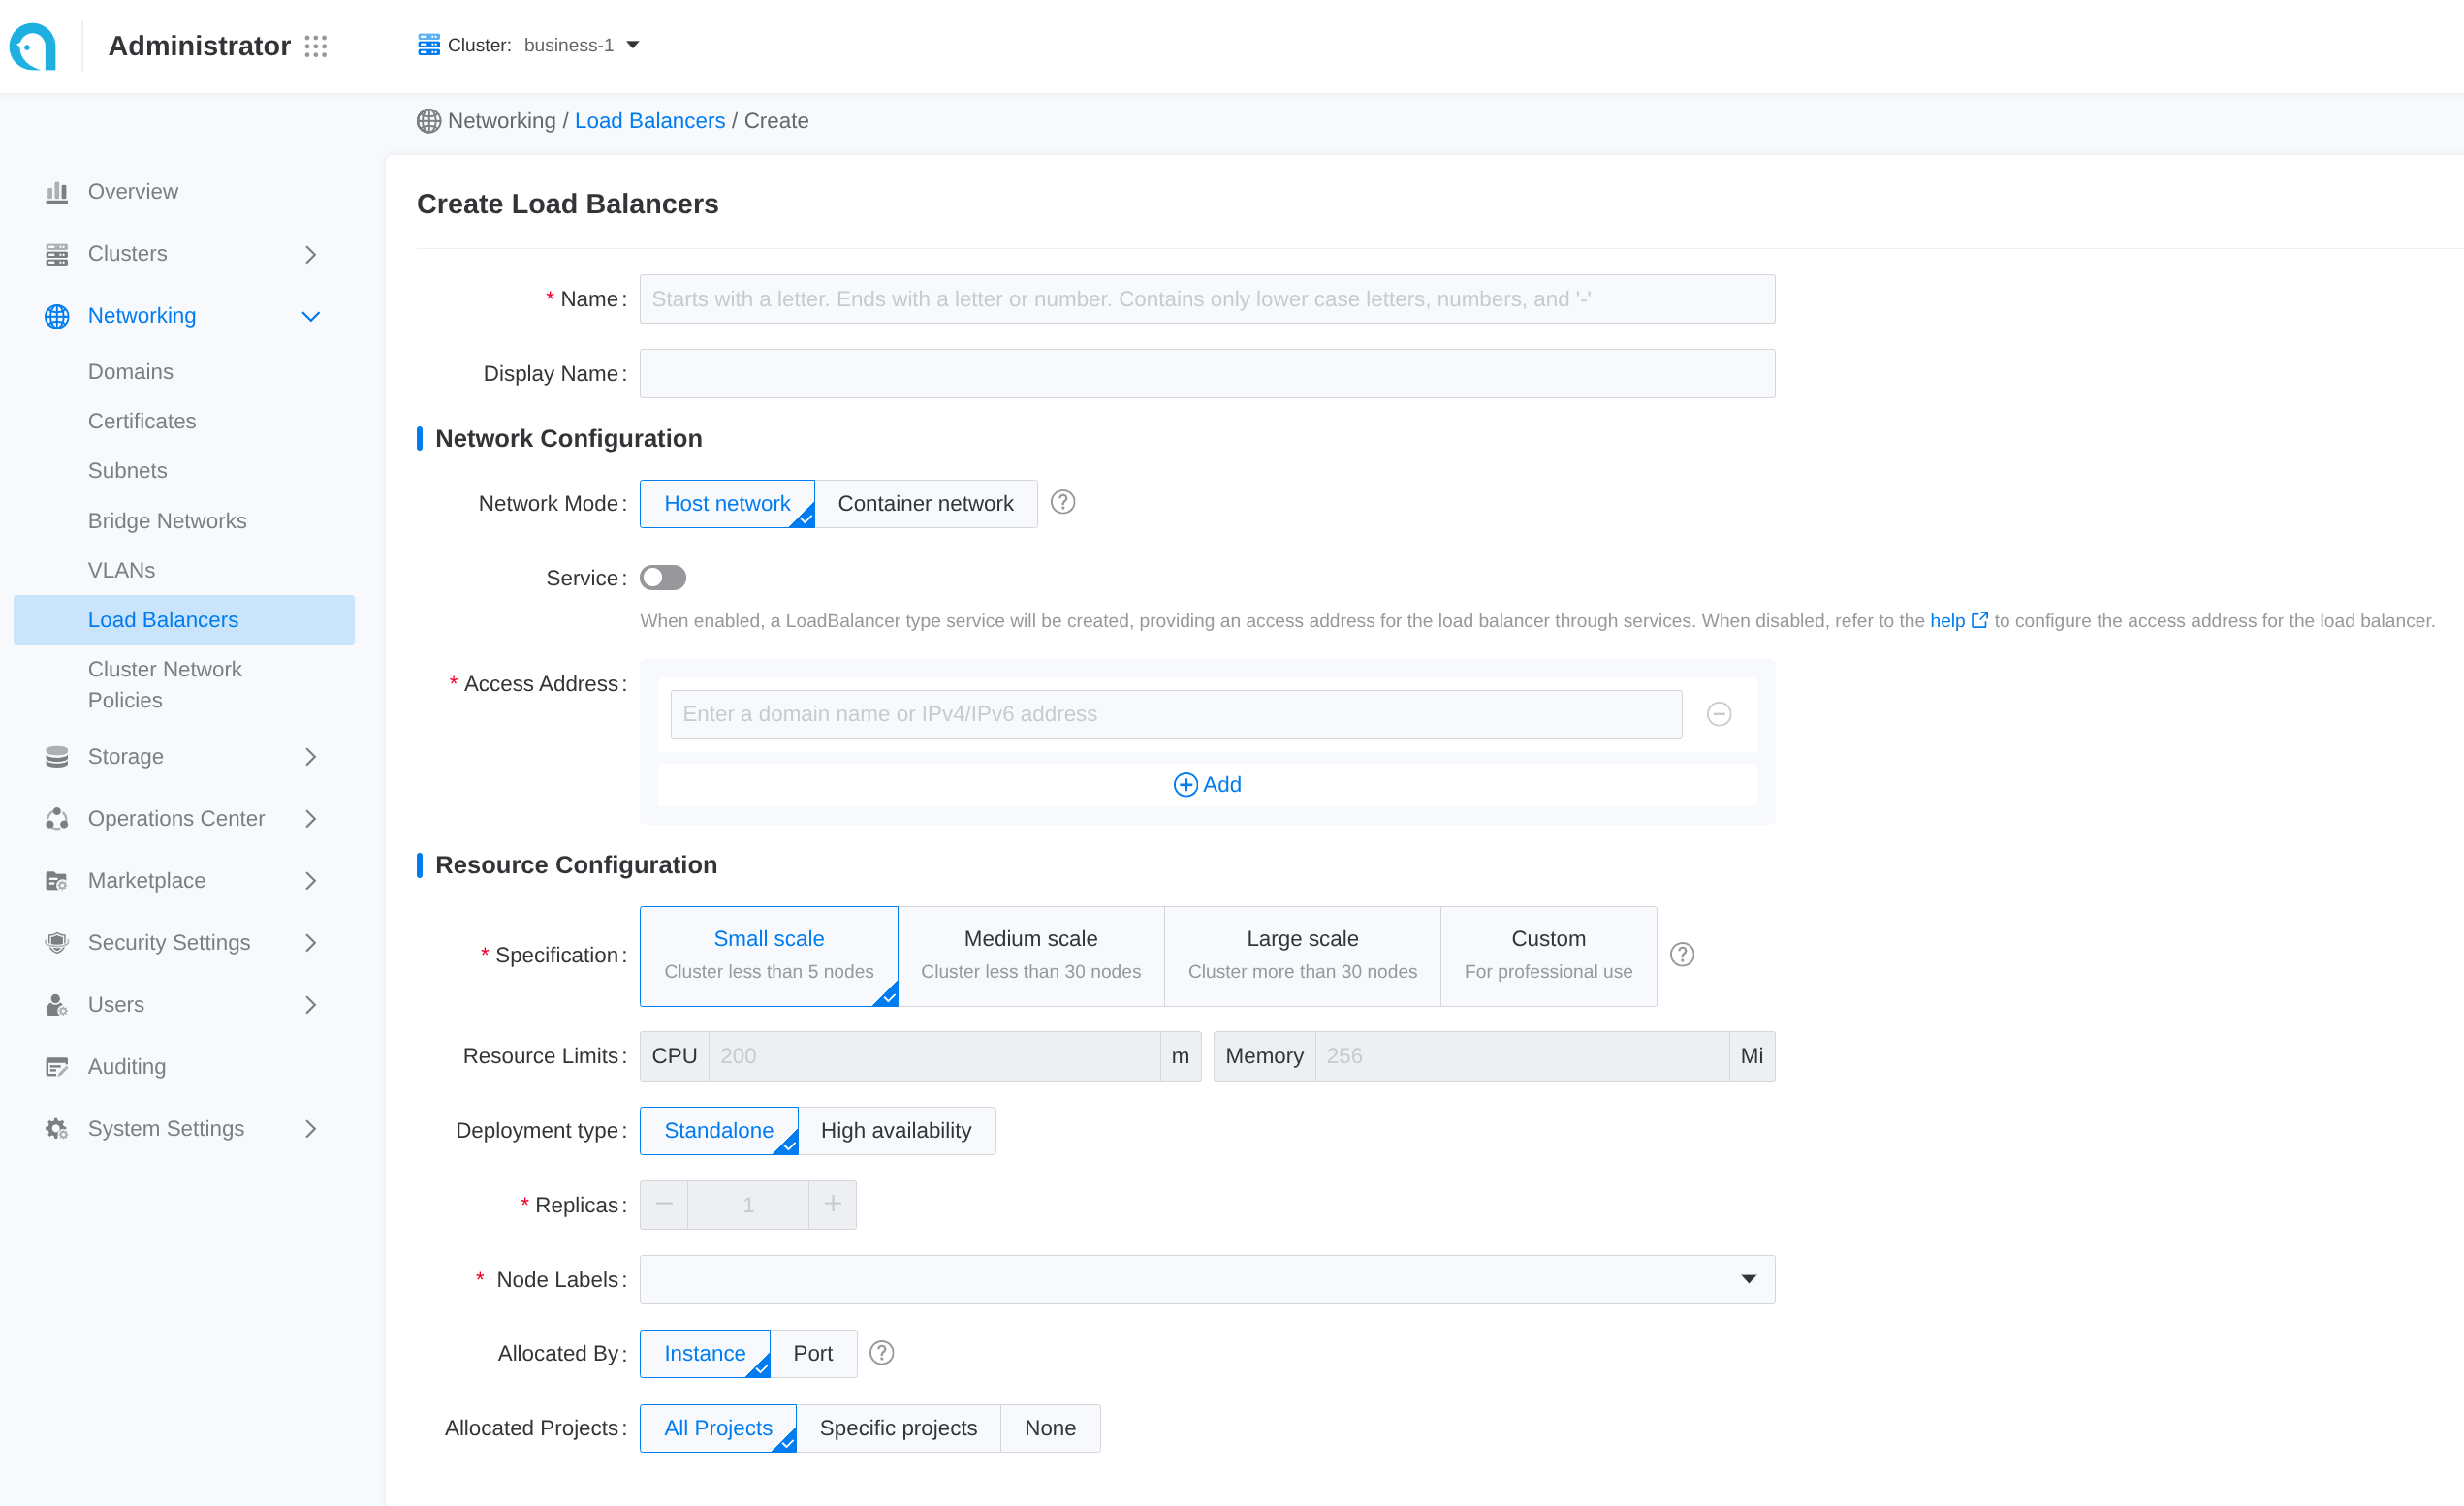
 Some common configuration is exposed in the web UI. Follow these steps to create a load balancer:
- Navigate to Administrator.
- In the left sidebar, click on Network Management > Load Balancer.
- Click on Create Load Balancer.
Each input item in the web UI corresponds to a field of the CR:
| Parameter | Description |
|---|---|
| Assigned Address | .spec.address |
| Allocated By | Instance means project mode, and you could select project below, port means port-project mode, you could assign port-range after create alb |
Using the CLI.
Update
Using the web console
Updating the load balancer will cause a service interruption for 3 to 5 minutes. Please choose an appropriate time for this operation!
-
Enter Administrator.
-
In the left navigation bar, click Network Management > Load Balancer.
-
Click ⋮ > Update.
-
Update the network and resource configuration as needed.
-
Please set specifications reasonably according to business needs. You can also refer to the relevant How to properly allocate CPU and memory resources for guidance.
-
Internal routing only supports updating from Disabled state to Enabled state.
-
-
Click Update.
Delete
Using the web console
After deleting the load balancer, the associated ports and rules will also be deleted and cannot be restored.
-
Enter Administrator.
-
In the left navigation bar, click Network Management > Load Balancer.
-
Click ⋮ > Delete, and confirm.
Using the CLI
Listener Ports (Frontend)
Frontend is a custom resource that defines the listener port and protocol for an ALB. Supported protocols: L7 (http|https|grpc|grpcs) and L4 (tcp|udp). In L4 Proxy use frontend to configure backend service directly. In L7 Proxy use frontend to configure listener ports, and use rule to configure backend service. If you need to add an HTTPS listener port, you should also contact the administrator to assign a TLS certificate to the current project for encryption.
Prerequisites
Create a ALB first.
Configure Frontend
-
alb label: Required, indicate the ALB instance to which this
Frontendbelongs to. -
frontend name: Format as
$alb_name-$port. -
port: which port which listen on.
-
protocol: what protocol this port uses.
- L7 protocol https|http|grpcs|grpc and L4 protocol tcp|udp.
- When selecting HTTPS, a certificate must be added; adding a certificate is optional for the gRPC protocol.
- When selecting the gRPC protocol, the backend protocol defaults to gRPC, which does not support session persistence.If a certificate is set for the gRPC protocol, the load balancer will unload the gRPC certificate and forward the unencrypted gRPC traffic to the backend service.
- If using a Google GKE cluster, a load balancer of the same container network type cannot have both TCP and UDP listener protocols simultaneously.
-
certificate_name: for grpcs and https protocol which the default cert used, Format as
$secret_ns/$secret_name. -
backendProtocol: what protocol the backend service uses.
-
Default
serviceGroup:- L4 proxy: required. ALB forwards traffic to the default service group directly.
- L7 proxy: optional. ALB first matches Rules on this Frontend; if none match, it falls back to the default
serviceGroup.
Operation On Frontend
Creating
using the web console

-
Go to Container Platform.
-
In the left navigation bar, click Network > Load Balancing.
-
Click the name of the load balancer to enter the details page.
-
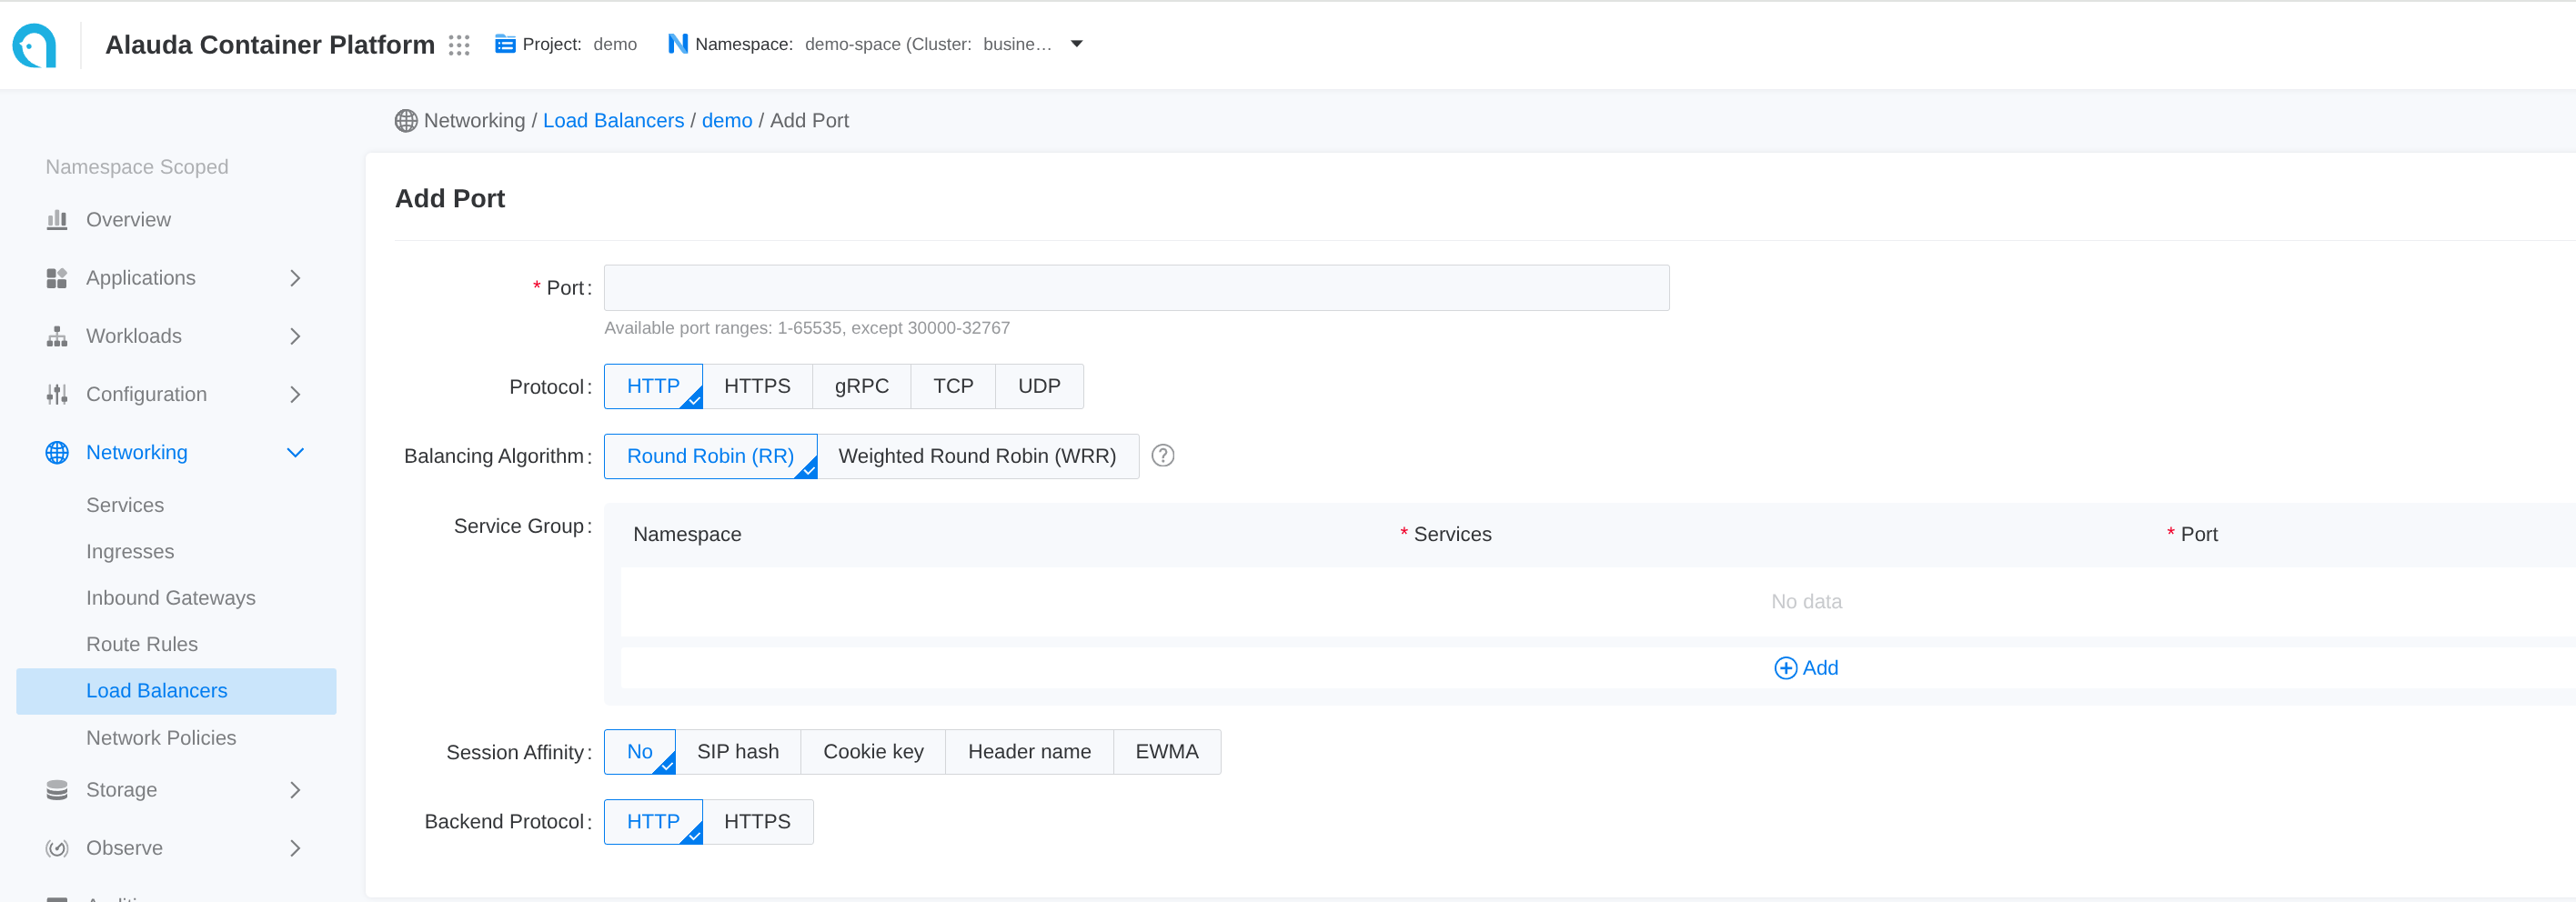
Click Add Port.
Each input item on the webui corresponds to a field of the CR
| Parameter | Description |
|---|---|
| Session Affinity | .spec.serviceGroup.session_affinity_policy |
using the CLI
Subsequent Actions
For traffic from HTTP, gRPC, and HTTPS ports, in addition to the default internal routing group, you can set more varied back-end service matching rules. The load balancer will initially match the corresponding backend service according to the set rules; if the rule match fails, it will then match the backend services corresponding to the aforementioned internal routing group.
Related Operations
You can click the ⋮ icon on the right side of the list page or click Actions in the upper right corner of the details page to update the default route or delete the listener port as needed.
If the resource allocation method of the load balancer is Port, only administrators can delete the related listener ports in the Administrator view.
Logs and Monitoring
By combining logs and monitoring data, you can quickly identify and resolve load balancer issues.
Viewing Logs
-
Go to Administrator.
-
In the left navigation bar, click on Network Management > Load Balancer.
-
Click on Load Balancer Name.
-
In the Logs tab, view the logs of the load balancer's runtime from the container's perspective.
Monitoring Metrics
The cluster where the load balancer is located must deploy monitoring services.
-
Go to Administrator.
-
In the left navigation bar, click on Network Management > Load Balancer.
-
Click on Load Balancer Name.
-
In the Monitoring tab, view the metric trend information of the load balancer from the node's perspective.
-
Usage Rate: The real-time usage of CPU and memory by the load balancer on the current node.
-
Throughput: The overall incoming and outgoing traffic of the load balancer instance.
-
For more detailed information about monitoring metrics please refer to ALB Monitoring.